Step 1: Create a New Cloud Instance
Preparation:
Create a new Active Directory Group (‘Test Cloud Administrators’) and a new user (‘vmmtest’)
$groupName='Test Cloud Administrators'
$samAccountName='TestCloudAdministrators'
$container="CN=Users,DC=Intranet,DC=KIMCONNECT,DC=Com"

New-ADGroup -Name $groupName -GroupCategory Security -GroupScope Global -DisplayName $groupName -Path $container -Description $groupName # -SamAccountName $samAccountName
$groupName='Test Cloud Administrators'
$newUsername='vmmtest'
$encryptedPassword=Read-Host -AsSecureString "Input User Password for account $newUsername"
New-ADUser -Name $newUsername -Enabled $True -AccountPassword $encryptedPassword
Add-ADGroupMember -Identity $groupName -Members $newUsername
$groupName='Test VMM Read-only Admins'
$samAccountName=$groupName -replace ' ','_'
$container="CN=Users,DC=Intranet,DC=KIMCONNECT,DC=Com"

New-ADGroup -Name $groupName -GroupCategory Security -GroupScope Global -DisplayName $groupName -Path $container -Description $groupName  # -SamAccountName $samAccountName
$groupName='Test VMM Read-only Admins'
$newUsername='VMM_Test_Admin_RO'
$encryptedPassword=Read-Host -AsSecureString "Input User Password for account $newUsername"
New-ADUser -Name $newUsername -Enabled $True -AccountPassword $encryptedPassword
Add-ADGroupMember -Identity $groupName -Members $newUsername
Grant ‘Test Cloud Administrators’ Group RDP access to VMM Server:
$groupEntity='Intranet\Test Cloud Administrators'
Add-LocalGroupMember -Group 'Remote Desktop Users' -Member $groupEntity
$groupEntity='Intranet\Test VMM Read-only Admins'
Add-LocalGroupMember -Group 'Remote Desktop Users' -Member $groupEntity
Use VMM To Create New Clouds
Start Virtual Machine Manager > right-click Clouds > select ‘Create Cloud’ to initiate the Create Cloud Wizard > Input a name for this new cloud (e.g. ‘Private Cloud 1’ or ‘Test Cloud’) > Next
Put a check mark next to the appropriate container > Next
Select the appropriate Network > Next

If necessary, select the appropriate NLB > Click Next

If necessary, select appropriate template > Next

If necessary, select the appropriate port classification > Next
Select the appropriate storage > Next

Click Browse to select an appropriate Stored VM Path > if necessary, click Add to select a read-only library shares (this must be a unique path)
Review the storage path and library shares > click Next when ready

Set appropriations of CPU, Memory, and Storage resources > Next

Select the available capability profile(s) > Next

If necessary, select the replication groups > Next

Pick an appropriate QoS policy > Next

Review the summary > click Finish when done
Possible Error:
---------------------------
Virtual Machine Manager
---------------------------
The specified path '\\FILESERVER\MSSCVMMLibrary' is not unique.

Ensure that the path or part of the path that you provided is not used as a writable library share path on a private cloud, a read-only share path on a private cloud, or a user role data path on a self-service user role.

ID: 23505
---------------------------
OK
---------------------------
Workaround: removed read-only library shares
Observe the Jobs window for the Cloud Creation progress

When the wizard has completed, a new Cloud item would appear as an icon under the Clouds tab

Performing the same steps via Scripting (obtained from ‘view script’ button):
Set-SCCloudCapacity -JobGroup "74b6-462e-877e" -UseCustomQuotaCountMaximum $true -UseMemoryMBMaximum $false -UseCPUCountMaximum $false -UseStorageGBMaximum $false -UseVMCountMaximum $true -MemoryMB 524288 -CPUCount 50 -StorageGB 6000

$resources = @()
$resources += Get-SCLogicalNetwork -ID "92d8-4678-a429"

$resources += Get-SCStorageClassification -ID "f9f9-4d3f-80c6"


$addCapabilityProfiles = @()
$addCapabilityProfiles += Get-SCCapabilityProfile -Name "Hyper-V"

Set-SCCloud -JobGroup "74b6-462e-877e" -RunAsynchronously -ReadWriteLibraryPath "\\VMMSERVER\MSSCVMMLibrary\Templates" -AddCloudResource $resources -AddCapabilityProfile $addCapabilityProfiles

$hostGroups = @()
$hostGroups += Get-SCVMHostGroup -ID "fa00-47f0-a451"
New-SCCloud -JobGroup "74b6-462e-877e" -VMHostGroup $hostGroups -Name "Test Cloud" -Description "" -RunAsynchronously
Step 2: Create a Role Based Access Control
Please note that this section is to create a ‘VM Administrator’ role. This is only available in Windows 2019 Server’s Virtual Machine Manager (VMM). This role has a broader scope of access as compared to ‘Tenant Administrator, which may be more fitting to grant limited self-service guest VM administrator level access to ‘virtual clouds’ without full visibility into the cluster. Therefore, these steps should only be observed as informational as it is more advisable to peruse the ‘Tenant Administrator’ RBAC in most scenarios.
To create an RBAC role for VM administrator, go to Settings > right-click User Roles > Create User Role

Type in the name as ‘Test Cloud Administrator’ > Next

Select ‘Virtual Machine Administrator’ > Next

Click Add > select Active Directory Users or Groups > OK > Next
Narrow down the scope (e.g. ‘Test Cloud’) > Next

Put a check mark to each desired permissions (as listed below) > Next
Role Based Access Controlled Virtual Machine Administrator Permissions:
- Checkpoint: Create and manage virtual machine checkpoints
  - Checkpoint (Restore only): Restore to but cannot create virtual machine checkpoints
- Deploy: Create virtual machines and service from VHDs or templates
  - Deploy (From template only): Create virtual machines and services form templates only
- Deploy shielded: Create shielded vitual machines
- Local Administrator: Grants local administrator rights on virtual machines
- Manage Azure Profiles: Create and Manage Azure Profiles
- Migrate virtual Machine and Storage: Migrate Virtual Machine acress Hosts and Clouds and storage of Virtual Machines
- Pause and resume: Pause and Resume virtual machines and services
- Receive: Receive resources from other self-service users
- Remote connection: Remotely connect to virtual machines
- Remove: Remove virtual machines and services
- Save: Save virtual machines and services
- Share: Share resources with other self-service users
- Shutdown: Shut down virtual machines
- Start: Start virtual machines and services
- Stop: Stop virtual machines and services
- Store and re-deploy: Store virtual machines in the library, and re-deploy those virtual machines
- Update VM functional level: Update Functional Level of the Virtual Machines
Add Library Servers (if required) > Next > Add ‘Run As Accounts’ (if required) > Next > Finish
Creating VM Administrator RBAC via Scripting:
$cloudsToAdd_0 = Get-SCCloud -ID "4cbb-4643-9bf9"
Add-SCUserRolePermission -Cloud $cloudsToAdd_0 -JobGroup "37f5-4362-84c8"
$scopeToAdd = @()
$scopeToAdd += Get-SCCloud -ID "4cbb-4643-9bf9"
Set-SCUserRole -JobGroup "37f5-4362-84c8" -AddMember @("INTRANET\TestAdmins") -AddScope $scopeToAdd -Permission @("Checkpoint", "CheckpointRestoreOnly", "CreateFromVHDOrTemplate", "Create", "AllowLocalAdmin", "MigrateVM", "PauseAndResume", "Shutdown", "Start", "Stop", "UpdateVMFunctionalLevel")
New-SCUserRole -Name "Test Cloud Administrator" -UserRoleProfile "VMAdmin" -Description "" -JobGroup "37f5-4362-84c8"
Step 3: Associating Guest VMs to Virtual Clouds
Note: assigning VMs into individual clouds are only possible if the Cloud entity has been associated with a Host Group that contains online Hyper-V Servers or Clusters.
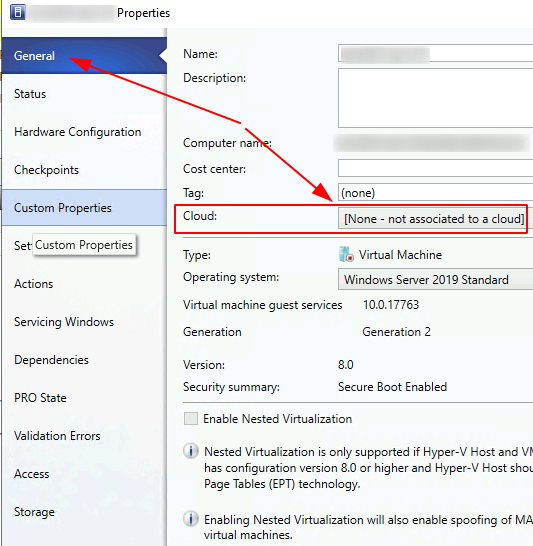
To associate individual virtual machines (VM’s) toward a particular ‘cloud’, one would run Virtual Machine Manager (VMM) > select VMs and Services > locate a desired VM > right-click that VM > Properties > select General Tab > pick the correct cloud name in the drop-down menu > OK to save
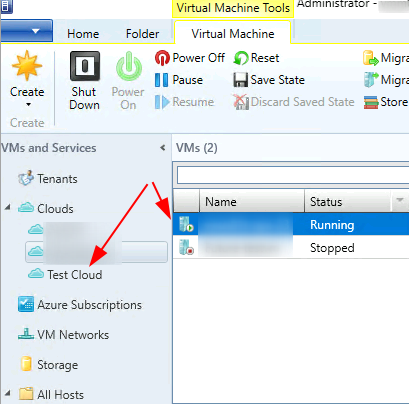
Once a VM has been configured toward a Cloud, it would be visible when that Cloud is selected
Bonus Materials: VMM User Roles Summary
Source: Microsoft
| VMM user role | Permissions | Details |
|---|---|---|
| Administrator role | Members of this role can perform all administrative actions on all objects that VMM manages. | Only administrators can add a WSUS server to VMM to enable updates of the VMM fabric through VMM. |
| Virtual Machine Administrator | (applicable for VMM 2019 and later) Administrators can create the role. | Delegated Administrator can create VM administrator role that includes entire scope or a subset of their scope, library servers and Run-As accounts. |
| Fabric Administrator (Delegated Administrator) | Members of this role can perform all administrative tasks within their assigned host groups, clouds, and library servers. | Delegated Administrators cannot modify VMM settings, add or remove members of the Administrators user role, or add WSUS servers. |
| Read-Only Administrator | Members of this role can view properties, status, and job status of objects within their assigned host groups, clouds, and library servers, but they cannot modify the objects. | The read-only administrator can also view Run As accounts that administrators or delegated administrators have specified for that read-only administrator user role. |
| Tenant Administrator | Members of this role can manage self-service users and VM networks. | Tenant administrators can create, deploy, and manage their own virtual machines and services by using the VMM console or a web portal. Tenant administrators can also specify which tasks the self-service users can perform on their virtual machines and services. Tenant administrators can place quotas on computing resources and virtual machines. |
| Application Administrator (Self-Service User) | Members of this role can create, deploy, and manage their own virtual machines and services. |
They can manage VMM using the VMM console. |


