Prepare to Install
⦁ Reserve host Management & vMotion IPs
⦁ Pick an available IP from the IP tracking spreadsheet
⦁ Ping such IP’s to ensure that it is not being used by an existing device
⦁ Confirm with Systems/Network Team that such IP could be assigned without conflicts
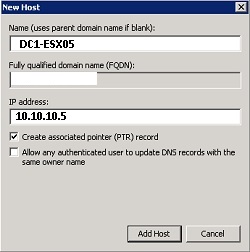
⦁ Add DNS entry of new host into Active Directory Integrated DNS
⦁ Access a DNS server
⦁ Run MMC DNS utility to add A-host and Reverse Lookup records for new host following the below example
⦁ Install SSH client & Internet browser onto client workstation
⦁ Add a SSH console such as OpenSSH Client or Putty
⦁ Verify that IExplorer, Chrome, or Firefox with HTML5 capability is available
⦁ Verify that the ISO is available at this path: ⦁ \\nas\System Engineering\Software\VMware\
⦁ Apply Server Profile
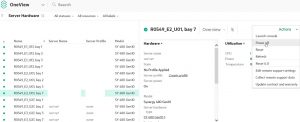
⦁ Prior to applying a server profile, the targeted host must be turned off: OneView > Server Hardware > Select the appropriate Server Item > Click on Actions > Power Off
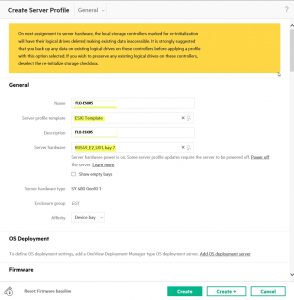
⦁ Create Server Profile
OneView > Server Hardware > Select the appropriate Server Item > Click on “Create Profile” from the Hardware section > mimic this screenshot to apply an ESXi Template
Initialize ESXi host
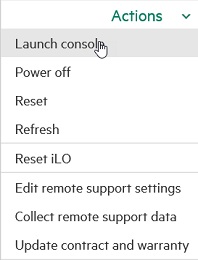
⦁ Launch iLO Console to mount the ESXi virtual ISO
⦁ Access OneView > Server Profiles > Actions > Launch Console
⦁ Assuming that the HTML5 or Java iLO Web Part has already been installed prior, this screen should appear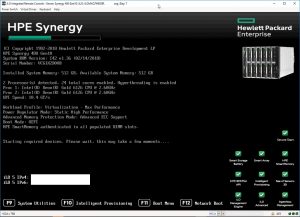
⦁ “Virtual Drives” is set via the Image File option
Begin the Install
⦁ Click on Power Switch and allow POST to proceed and pause at this screen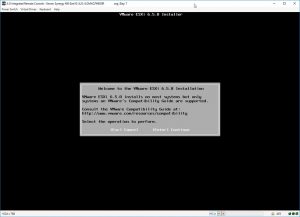
⦁ Click Continue and follow the prompt to arrive here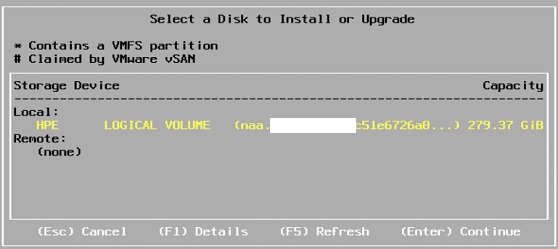
⦁ Do not perform an in place upgrade with older version if prompted. Select overwrite for installation.
⦁ Generate the root password according to our standardized requirements
⦁ Input the host’s root password into Passwords Safe
⦁ Press F2 to log into the console for the initial “System Customization”
⦁ From the “Troubleshooting Options” screen, Enable the ESXi Shell and SSH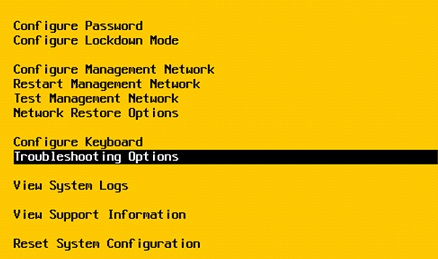
![]()

⦁ Set management console IP, subnet and default gateway (sample below)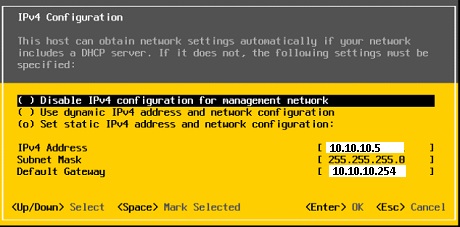
⦁ Disable IPv6 configuration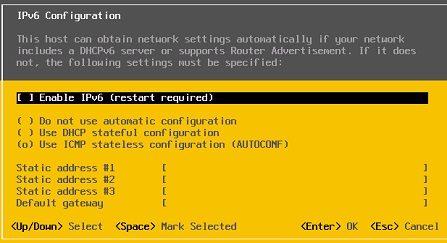
⦁ Set in lower case the FQDN hostname and DNS servers:
⦁ Mars: Primary 10.10.10.10 Secondary 10.10.10.11
⦁ Venus: Primary 10.10.20.10 Secondary 10.10.20.11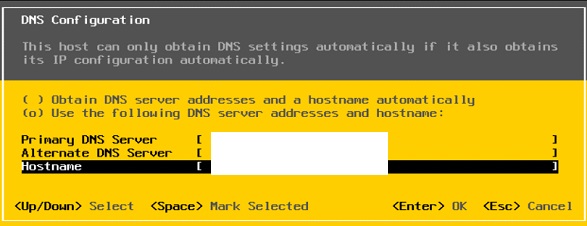
⦁ Set the domain name for Custom DNS Suffixes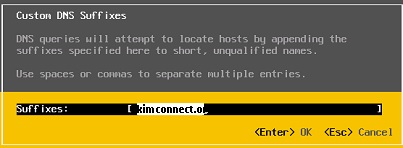
⦁ Test Management Network Settings
⦁ Ping the management console IP to test the network settings.
⦁ Verify setup by using the Testing Management Network utility
Perform More Configurations via SSH
Engineers may prefer to use the console shell or another SSH client such as putty to execute these lines. These instructions are intended for those that already have familiarity with ESXi servers and CLI commands. Thus, CLI tools availability on the Engineer’s PC is assumed.
Change IP Address of ESXi Host (optional)
# List hypervisor's network interfaces
esxcli network ip interface ipv4 get

# Sample output
[root@esx76:~] esxcli network ip interface ipv4 get
Name IPv4 Address IPv4 Netmask IPv4 Broadcast Address Type Gateway DHCP DNS
---- --------------- ------------- --------------- ------------ ------------- --------
vmk0 10.10.46.101 255.255.255.0 10.10.46.255 STATIC 10.10.46.1 false

# set new ip
interface=vmk0
ipAddress=10.10.40.35
netmask=255.255.255.0
esxcli network ip interface ipv4 set -i $interface -I $ipaddress -N $netmask -t static
Configure Isolation Tools
⦁ Execute the following command from the CLI as the root user:
cp -p /etc/vmware/config /etc/vmware/config.orig

echo 'isolation.tools.copy.disable = "FALSE"' >> /etc/vmware/config

echo 'isolation.tools.paste.disable = "FALSE"' >> /etc/vmware/config

cat /etc/vmware/config
Add centralized logging
⦁ Execute the following command from the CLI (assuming 10.10.10.100 is the syslog server):
esxcli system syslog config set --loghost='udp://10.10.10.100:514'

esxcli system syslog reload

esxcli network firewall ruleset set --ruleset-id=syslog --enabled=true

esxcli network firewall refresh
- Check settings
[KIMCONNECT\admin@FLO-ESX05:~] esxcli system syslog config get
   Default Network Retry Timeout: 180
   Dropped Log File Rotation Size: 100
   Dropped Log File Rotations: 10
   Enforce SSLCertificates: true
   Local Log Output: /scratch/log
   Local Log Output Is Configured: false
   Local Log Output Is Persistent: true
   Local Logging Default Rotation Size: 1024
   Local Logging Default Rotations: 8
   Log To Unique Subdirectory: false
   Message Queue Drop Mark: 90
   Remote Host: udp://10.10.10.100:514
ESXi Storage configuration
Change default pathing policy and IOPS options
⦁ Execute the following command from the CLI to set the default PSP:
esxcli storage nmp satp set --default-psp=VMW_PSP_RR --satp=VMW_SATP_ALUA
⦁ Use the following command to create a custom SATP rule that will allow the ESXi host to configure the HPE 3PAR LUNs to use Round Robin multipath policy. The command must be executed on each ESXi host that is connected to the HPE 3PAR array.
esxcli storage nmp satp rule add -s "VMW_SATP_ALUA" -P "VMW_PSP_RR" -O "iops=1" -c "tpgs_on" -V "3PARdata" -M "VV" -e "HPE 3PAR Custom Rule"
⦁ Verify the new rule using the following commands:
esxcli storage nmp device list
esxcli storage nmp satp list
esxcli storage nmp satp rule list | grep "3PARdata"
⦁ Set the queue-full-threshold parameter to a value less than or equal to queue-full-sample-size:
esxcli system settings advanced set -o /Disk/QFullSampleSize -i "32"
esxcli system settings advanced set -o /Disk/QFullThreshold -i "4"
⦁ Disable ATS heartbeats:
esxcli system settings advanced set -i 0 -o /VMFS3/UseATSForHBOnVMFS5
⦁ Review settings:
esxcli system settings advanced list -o /VMFS3/UseATSForHBonVMFS5

Secure ESXi Host
Configure TLS
Run the following command to only enable TLS1.2 for the UserVars.ESXiVPsDisabledProtocols Advanced setting
esxcli system settings advanced set -o /UserVars/ESXiVPsDisabledProtocols -s "sslv3,tlsv1,tlsv1.1"
Edit the config.xml file
⦁ Make a backup of config.xml
cp -p /etc/vmware/rhttpproxy/config.xml /etc/vmware/rhttpproxy/config.xml_orig
⦁ Edit the config file using vi text editor
vi /etc/vmware/rhttpproxy/config.xml
⦁ Type /ssl to search for that keyword > press enter > edit the SSL section with this:
<ssl>
<doVersionCheck> true </doVersionCheck><!-- allowed SSL/TLS protocol versions --><protocols>tls1.2</protocols>
 	<cipherList>!aNULL:kECDH+AESGCM:ECDH+AESGCM:!RSA+AESGCM:kECDH+AES:ECDH+AES:!RSA+AES</cipherList>
 	   	<libraryPath>/lib/</libraryPath>
</ssl>
Add TLS and Cipher Settings
TLS and Cipher settings are set inside the configuration file of the small footprint CIM broker (SFCB) since that Common Information Model (CIM) provider controls sfcbd and openwsman in ESXi 6.5. It must be disabled for changes in SFCB to become effective.
⦁ Disable the WBEM and execute the following commands
esxcli system wbem set --enable false
⦁ Make a backup of fscb.cfg
cp -p /etc/sfcb/sfcb.cfg /etc/sfcb/sfcb.cfg_orig
⦁ Append some lines to the tail of sfcb.cfg file
cat << EOT >> /etc/sfcb/sfcb.cfg
enableTLSv1:false
enableTLSv1_1:false
enableTLSv1_2:true
sslCipherList:!aNULL:kECDH+AESGCM:ECDH+AESGCM:kECDH+AES:ECDH+AES
EOT
⦁ Re-enable the WBEM services.
esxcli system wbem set --enable true
Disable remote SSH root login and CBC cipher
These procedures will require a host reboot or systems reload to become effective. Please be advised that once this policy is active, CLI root commands will be prevented.
⦁ Backup the sshd_config file prior to changing it
cp -p /etc/ssh/sshd_config /etc/ssh/sshd_config.orig
⦁ Execute the following command from the CLI to disable remote root login and CBC Ciphers
⦁ Execute the following command to confirm new settings
cat /etc/ssh/sshd_config
Optional: Re-enable SSH Root Login
In the event that SSH root login is required (or when Active Directory integration is broken), this is the method to reverse changes in previous sub-section.
⦁ Gain console access to ESXi host
⦁ If using HPE OneView: click on OneView > Server Profiles > highlight the correct ESXi host name > click on Actions > Launch Console
⦁ If using iLO: simply login to the iLO IP address or hostname of the intended machine and launch console
⦁ Edit sshd_config via ESX Shell within console
⦁ At the login screen, press Alt + F1 to enter Shell Mode
⦁ Execute the following command from the CLI to disable remote root login and CBC Ciphers:
⦁ Restart sshd
/etc/init.d/SSH restart
⦁ Exit Shell Mode by pressing Alt + F2
Further Configuration via Web UI
⦁ Navigate to the ESXi server Web UI URL using iExplore or Chrome: https://servername_or _IP/
⦁ Uncheck Join the VMware Customer Experience Improvement Program. This prompt only appears once upon initial login.
⦁ Right click on Host to “Enter Maintenance mode”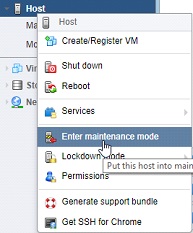
⦁ Set Admin Groups
⦁ Navigate to the “Manage” menu, click on the “System” tab and under Advanced Settings, rename the “Config.HostAgent.plugins.hostsvc.esxAdminsGroup” value to “VMware Enterprise Admins”
⦁ On the “System” tab under Advanced Settings, change the “UserVars.SuppressShellWarning” value to “1”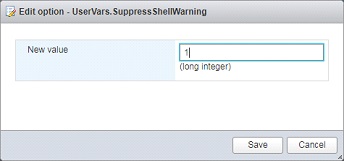
Configure time sources
⦁ Navigate to Manage > System > Time & date > Edit settings
⦁ Select Start and stop with host for the NTP Service Start Policy
⦁ Set the appropriate NTP Servers by separate them with commas
10.10.10.10, 10.10.10.11 (DC1 & DC2)
⦁ Save settings
⦁ Click on Actions > NTP Service > Start
Set Certificates
Rename local data stores
Navigate to the “Storage” menu > rename the local Datastore to HOSTNAME_001 (e.g. FLO-ESX05_001)
Join Active Directory
⦁ Click on “Manage” > “Security and users” > “Authentication > “Join Domain”
⦁ Use a Domain Admin account to complete this step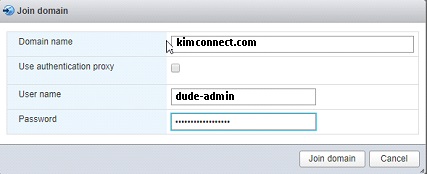
Configure Networking
⦁ Click on “Networking” > right-click “VM Network” > Remove
⦁ Select Virtual Switches tab > right-click vSwitch0 > Add Uplink > configure all the Security settings to Reject > Save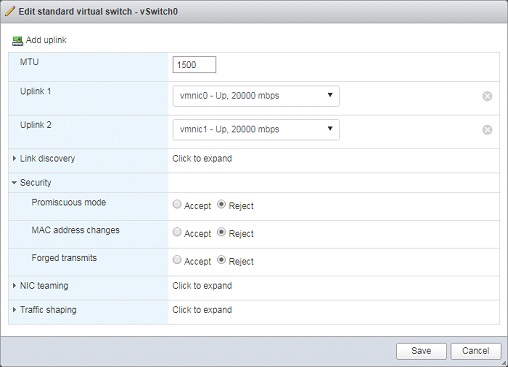
⦁ Click Add standard virtual switch > name it vSwitch1 > set vmnic 6 as uplink 1 > Add > right-click vSwitch1 > Add uplink > select vmnic7 > Save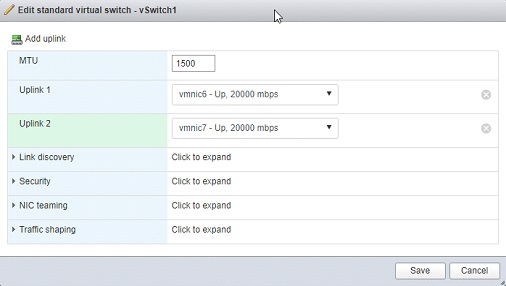
⦁ Select the VMKernel NICs tab > Add VMkernel NIC > set New port group as “vMotion” > click IPv4 settings > input an assigned static IP and Subnet mask > set TCP/IP stack as “vMotion stack” > Create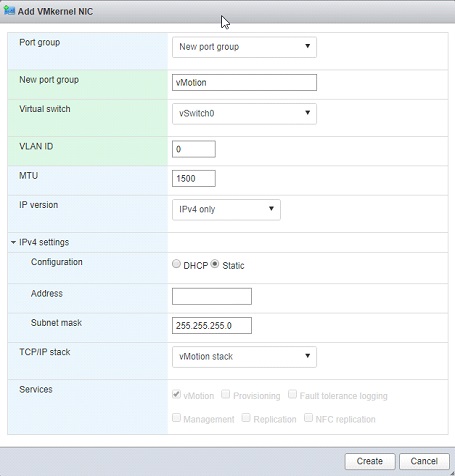
⦁ Click on Port groups tab > add a new port group with the format of 082_10.X.X to vSwitch0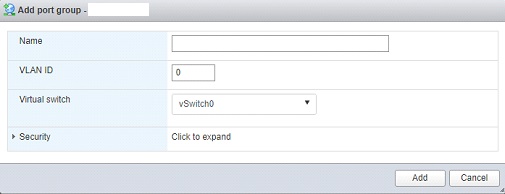
⦁ Right-click “Management Network” port group > NIC Teaming > confirm the Override failover order for the NIC teaming of “vmnic1” as “Standby” > Save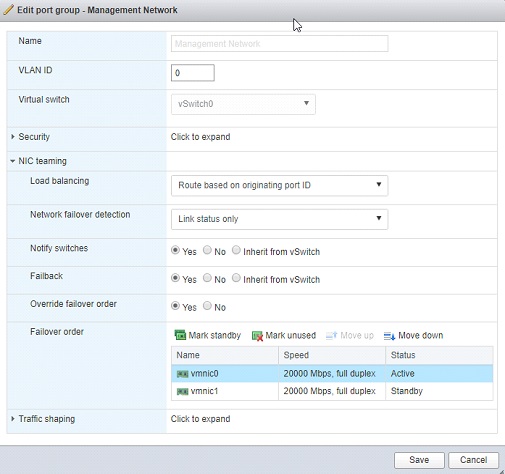
⦁ Right-click “vMotion” port group > NIC Teaming > set NIC Teaming Failover order of“vmnic0” as “Standby” > Save
⦁ Select Port groups tab > add a new port group name vCSA-HA to vSwitch1 with default settings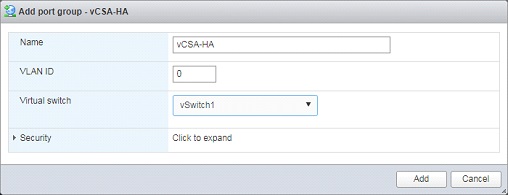
⦁ Select Port groups tab > add a new port group name MSCS to vSwitch1 with defaults settings
vCenter Integration
Add ESXi host to vCenter
⦁ Log into the vCenter vSphere Web Client and add the ESXi host to the data center object.
⦁ This screenshot is showing a new host addition to the LAS cluster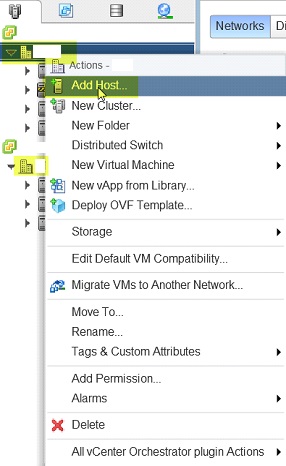
Licensing
⦁ Licensing options may already have been set in the previous step. In case it has been bypassed, here is the sequence to access this screen:
Select host > Configure > System > Licensing > Assign License
⦁ Associate new host with a valid license (VMware vCloud Suite Advanced for vSphere 6)
Configure with vSphere Distribute Switch
This section assumes that Distributed Switch(es) are already created prior, and that our new ESXi host is to be added into such Distributed Switches
⦁ From the “Networking” tab, locate and right-click on the desired “vSphere Distributed Switch”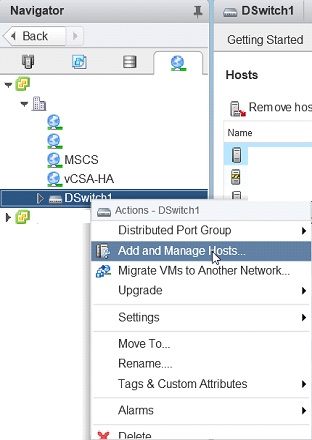
⦁ Click on “Add and Manage Host,” then follow the wizard to completion while match these hinting screenshots
⦁ Uncheck the default selection of “Manage VMkernel adapters” while following the wizard prompts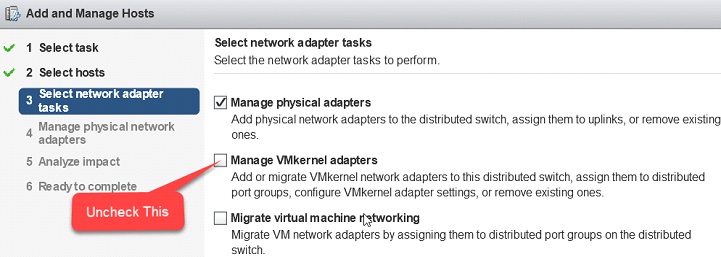
⦁ Set vmnic4 & vmnic5 as uplinks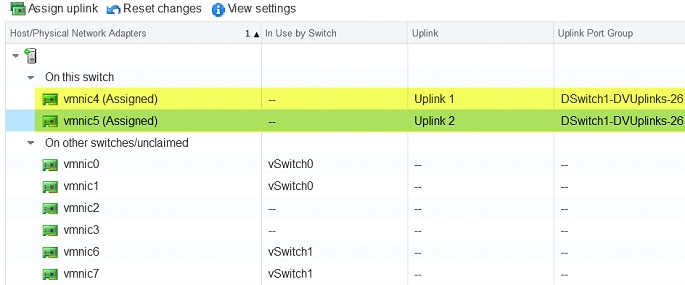
Update VMWare Host
VMWare Update Manager
⦁ Ensure that the host is in “Maintenance” mode.
⦁ From the “Update Manager” tab, highlight the server and click on the “Scan” link from the top right corner.
⦁ After the scan has completed, click on the “Stage Patches” button. Select these baselines to stage the targeted host:
⦁ Critical Host Patches (Predefined)
⦁ Non-Critical Host Patches (Predefined)
⦁ Click on Remediate and apply the patches using the default choices presented by the wizard. The machine will reboot during this process.
⦁ Enabling the ESXi Side-Channel-Aware Scheduler using the vSphere Web Client.
Click on Configure > Advanced System Settings > Search for “VMkernel.Boot.HyperthreadingMitigation” > Edit > Search for “Restrict” > select “Enabled” > OK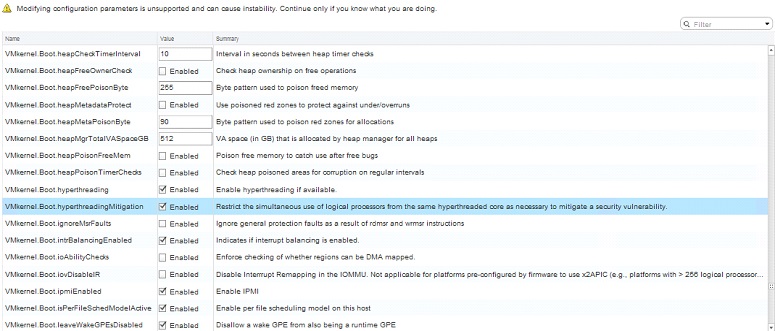
Scan for Vulnerabilities
⦁ Notify Information Security team to perform a risk assessment with a vulnerability scan.
⦁ Remediate any identified vulnerabilities.
Validate Machine Production Ready
⦁ Move one test VM to this new ESXi host to verify functionality (like login, ping from remote host…).
Set Host as Ready for production
⦁ Move the ESXi host to the proper cluster.
⦁ Notify Infrastructure team of the new ESXi host availability
Troubleshooting Section
⦁ Unable to connect via vSphere Client with this error: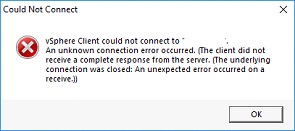
Resolution: install the correct version of vSphere Client or use the browser based version of vSphere client to connect to the ESXi host.
⦁ How to restart all services on ESXi without a reboot
services.sh restart
⦁ Restart host management agents
/etc/init.d/hostd restart
/etc/init.d/vpxa restart
