Overview:
Microsoft Fail-over Clustering is often deployed in conjunction with SAN storage. In this scenario, we are providing the imaginary administrative procedures of a duo HPe Nimble SAN storage with multiple Windows nodes running Microsoft Fail-over Clustering services.
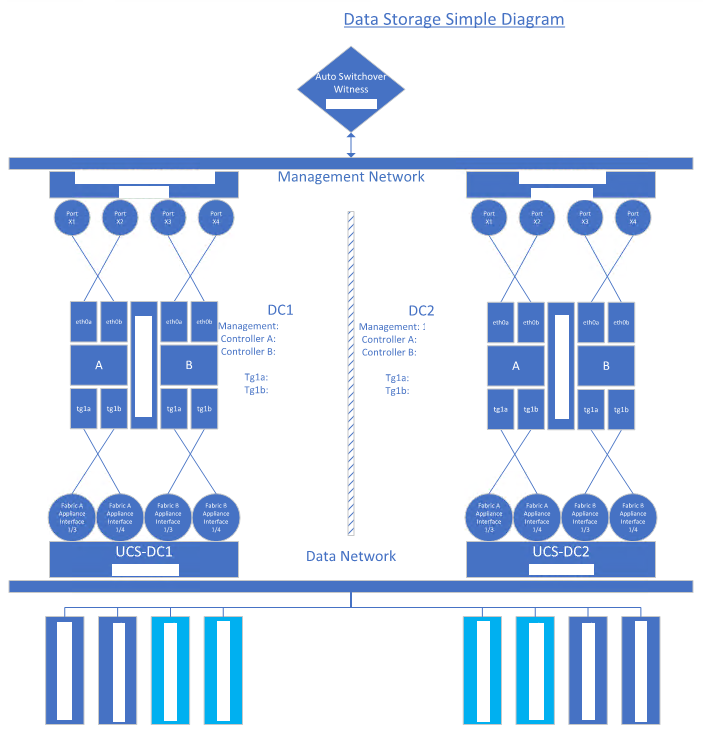
Our fictional scenario consists the two storage appliances, each physically hosted at DC1 and DC2. The network link between those to data centers are having latency lower than 100 milliseconds (averaging around 14ms); hence, they are configured as a “metro-link” on a “spanned-VLAN”. Although our focus will not be on the network aspects, our drawing would generalize the connections between various pieces of this puzzle. Our solution shall be considered an ideal condition for storage fail-over purposes of this use-case.
As a systems high level view, server nodes shall comprise of Cisco Unity modules. They are strategically placed as matching pairs between DCs. Each of the server is running on Windows 2016 operating systems with Microsoft fail-over clustering enabled to serve file-server roles. At this front-end layer, all roles are also balanced within CLUSTER1 and CLUSTER2.
Below are some assumptions as parameters for our make-believe system:
- – Nimble Storage has been deployed and infrastructural components such as networking & Operating Systems are stable
- – There are no network issues affecting the HPe storage arrays in DC1 and DC2
- – SAN storage utilization has not reached critical levels
- – Windows 2016 Servers have been clustered using MS Fail-over Clustering
- – All nodes in clusters share the same LUNs that are controlled by Fail-over Clustering
- – Admin credentials have been provided to the Administrator performing these operational tasks
Here are some pictures to substitute for a few hundred words:
A. Storage Array Connections
B. Automatic Switchover Simulation
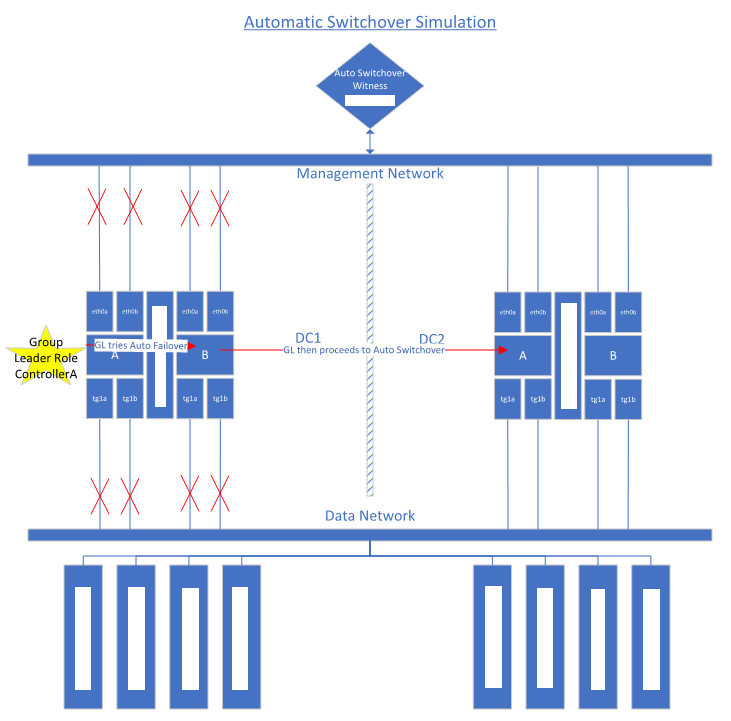
Table of Contents:
1. How to Create Volumes
2. How to Increase Volume Size
3. How to Put SAN in Maintenance Mode
4. How to Manually Switchover between Storage Arrays
5. How to Create New Virtual File Server Role with Client Access Point (To Map SMB Shares)
6. How to Change Virtual File Server Name
7. How to Create Protection Group
8. How to Restore from HPE Nimble Snapshot
9. How to Restore Files Using VSS Snapshots
10. General Cisco Unity Admin Tasks
11. Maintenance Shutdown Sequence
12. Miscellaneous Troubleshooting Information
13. Vendor Support Contacts
1) How to Create Volumes
Step 1: Create volume in the HPe Nimble Storage SAN
Log into HPE Nimble Storage as an administrator > Manage > Data Storage > under Volumes, click on the plus ‘+’ sign to Add new volume > input: Name = [purpose of volume], Location = DC1 pool, Performance Policy = Windows File Server, Size = desired LUN capacity, Data Protection = select a Protection Group, Access = select the File Server Cluster name, LUN = default > click Create

Step 2: Prepare the volume on a Windows machine
This step requires that the previous process has been successfully completed to render iSCSI LUN as available to the target Windows machine.
Log onto a node of the targeted Microsoft Cluster > Run PowerShell as Administrator > diskmgmt.msc
>> Right-click on correct disk index > set it online > initialize as GPT > format with 16K cluster size (see below) and assign a volume letter to it
o Cluster size NTFS Max Size
o 512 bytes 2,199,023,255,040 (2TB)
o 1024 bytes 4,398,046,510,080 (4TB)
o 2048 bytes 8,796,093,020,160 (8TB)
o 4096 bytes 17,592,186,040,320 (16TB) Default cluster size
o 8192 bytes 35,184,372,080,640 (32TB)
o 16384 bytes 70,368,744,161,280 (64TB)
o 32768 bytes 140,737,488,322,560 (128TB)
o 65536 bytes 281,474,976,654,120 (256TB)

# The Scripting Method:
# Set disk as online via GUI
# Run diskmgmt.msc > locate newly created volume > right-click > Online > note # the disk number as value for below variable

# Set disk name and number
$diskNumber="13"
$diskName="TESTAPP"
$driveLetter="Z"
$tempDriveLetter="X" #Make sure that this letter is currently not in use

# Create volume
function createVolume{
        # Set variables
        $drivePath=$driveLetter+":"
        $tempPath=$tempDriveLetter+":"

        "Processing disk number $diskNumber`: set drive letter as $driveLetter & label equals $diskName"

        # Clean disk
        Clear-Disk -Number $diskNumber -RemoveData -Confirm:$False

        # Set partition as GPT
        Initialize-Disk -Number $diskNumber -PartitionStyle GPT -InformationAction SilentlyContinue

        # Create a new partition and format it
        New-Partition $diskNumber -UseMaximumSize -DriveLetter $tempDriveLetter
        Format-Volume -DriveLetter $tempDriveLetter -FileSystem NTFS -AllocationUnitSize $sectorSize -NewFileSystemLabel $diskName -Confirm:$false -Force

        # Online disk and mark writable
        Set-Disk $diskNumber -isOffline $false
        Set-Disk $diskNumber -isReadOnly $false

        # Use WMI to relabel volumes as PowerShell currently doesn't have this capability
        $disk = Get-WmiObject -Class win32_volume -Filter "Label = '$diskName'"
        Set-WmiInstance -input $disk -Arguments @{DriveLetter=$drivePath; Label="$diskName"}

        Remove-PartitionAccessPath -DiskNumber $diskNumber -PartitionNumber 2 -Accesspath $tempPath
        }
createVolume

# Add disk to cluster
Get-Disk -Number $diskNumber | Add-ClusterDisk | %{$_.name=$name }
Connect to correct cluster > expand Storage > right-click on Disks > Add Disk > put a check mark next to the desired disk > OK > right-click the newly added disk > properties > Change the name > OK


2) How to Increase Volume Size
Step 0: Verify that a volume is reaching critical utilization
Run cluadmin.msc > Failover Cluster Manager > expand Cluster Name > Storage > Disks > select a targeted disk > check the Volumes graphical display

Step 1: Remove volume from Protection Group
Login to HPe Nimble Storage Management GUI > click on Manage > Data Storage > click the target volume > Edit > Next to advance to the Space settings > Next to advance to the Protection Settings > select “No Volume Protection” > Save > select Okay to disassociate… > Make Edits to commit change
Step 2: Delete ‘Orphaned’ Copy
Click on Manage > Data Storage > put a check-mark next to the target volume’s previous replicated copy (should be shown as offline) > click on “X” or “Remove” button > verify that the volume to delete is the orphaned copy > Delete
Step 3: Edit LUN capacity Add volume back to Protection Group
Click on Manage > Data Storage > click the target volume > Edit > Next to advance to the Space settings > type in a numerical value to represent the desired volume size (e.g. change from 2.4 TiB to 3.0 TiB) > Click on Manage > Data Protection > click on the correct Volume Collection (also known as protection group) > Actions > Edit > highlight the target volume in the Available pool > Add > Save > put a check mark next to Okay to resize volume > Make Edits
Step 4: Expand volume on a Windows host
GUI method:
RDP into host of target volume > Run diskmgmt.msc > right-click target volume > Extend volume > Next > Next > Next > OK
CLI method:
# Update these variables
$fileServerRole="TESTSHERVER007"
$driveLetter="D"

# Locate the host for the file server role
$roleOwner=(Get-ClusterResource -Name $fileServerRole).OwnerNode.Name

$session=New-PSSession -ComputerName $roleOwner
if($session){
            Write-Host "Expanding $driveLetter for $fileServerRole currently owned by $roleOwner...";
            Invoke-Command -Session $session -ScriptBlock{
                param($driveLetter)

                # Resize volume to its available maximum
                Update-HostStorageCache
                $max=(Get-PartitionSupportedSize -DriveLetter $driveLetter).SizeMax
                Resize-Partition -DriveLetter $driveLetter -Size $max
            } -Args $driveLetter
    }
Remove-PSSession $session
3) How to Put SAN in Maintenance Mode
A) Scenario 1: Putting a Primary Controller on Standby Mode while retaining workloads on same Array
Login to Nimble Storage Array > Hardware > click on “Make Active” on the secondary controller to render the current primary controller as inactive

B) Scenario 2: Moving All Workloads to a Different Array (Different Data Center)
Login to Nimble Storage Array > Manage > Data Protection > select the protection group > click on the “More” button as signified by the three dots “…” > HANDOVER

Click on HANDOVER again to confirm

4) How to Manually Switchover between Storage Arrays
Automatic Switchover is enabled on the Storage Arrays. Hence, if the management network & storage network are offline in one data center, the storage workload will automatically fail-over to the secondary data center. Here is the current outlook of this technology:

According to the ‘matrix’ above, in the event that only the iSCSI network is disconnected, whereby the Storage Array still monitors itself as being in an inconsistent state, its LUNs will also be rendered as offline – no automatic failovers. Following is the example procedure to manually set a cloned copy of an original LUN as primary in such scenarios.
Recommended Action Items Per Scenario:
- a. If only iSCSI is disconnected, do this…
- b. If only Mgmt interfaces are down, do this…
- c. If both iSCSI and Mgmt are down, do this…
Manual Intervention Steps
Part A: Failover at the SAN level
Assumptions:
– Production Site (DC1)
– Secondary Site (DC2)
– Target Volume: TESTAPP
Step 1: remove TESTAPP from its Protection Group:
Login HPe Nimble Storage > Manage > Data Storage > select DC1 > put a check mark next to TESTAPP > click on the pencil icon to Edit

Click on Protection link > select “No volume collection” > Save > put a check mark next to “No volume collection? > click Make Edits

Step 2: delete original copy
Navigate back to Manage > Storage > DC1 > put a check mark next to TESTAPP > click on “…” icon > Set Offline > Yes > click on the ‘X’ button to delete this original copy > confirm
Step 3: set cloned copy as new original
Navigate back to Manage > Storage > DC2 > put a check mark next to TESTAPP > click on “…” icon > Set Online > Yes
Step 4: Add volume back to Protection Group
Click on Manage > Data Protection > click on the correct Volume Collection (DC2-toDC1) > Actions > Edit > highlight the target volume in the Available pool > Add > Save
Part B: Failover at the File Server level
Step 1: Move disk ownership to a specific node
Run: Cluadmin.msc > Connect to the correct cluster > Failover Cluster Manager > > [Cluster_Name] > Storage > Disks > select TESTAPP disk name > Move > Select Node > highlight the desired node > OK
Step 2: Online disk at the OS layer (optional, dependent on whether disk automatically goes online)
Log onto the node specified above > Run: diskmgmt.msc > right-click the correct disk number > select option Online
Step 3: move server to desired node (optional)
Run: Cluadmin.msc > Failover Cluster Manager > [Cluster_Name] > Roles > right-click the virtual fileserver item on the list > Move > Select Node > pick a server node on the presented list > OK > OK
5) How to Create New Virtual File Server Role with Client Access Point (To Map SMB Shares)
There are two options of creating new virtual File Server Roles, and they are presented below:
Option A: Creating a new Role and map “one to one” with a volume
This is the simplistic model for setting up virtual file servers. If there are enough volume drive letters, then 1-to-1 mapping between volumes and File Server Role with Client Access Point makes it easier to identify volumes and its intended SMB shares.
Connect to a node of the cluster > run: cluadmin.msc > click on Roles > Configure Roles > Next > select File Server > Next > Next

Input Server Name & IP address > Next

Select the associated disk to be associated with this role > Next > Finish the wizard

Option B: Creating a new “Client Access Point” to be nested inside an existing Role
The advantage of this option is that new virtual file servers could be created without requiring a 1-to-1 mapping of associated volume or drive letter. The disadvantage is that “browsing” virtual file servers to locate SMB shares would require a few extra steps. Here is the procedure to generate a new Client Access Point:
Connect to a node of the cluster > run: cluadmin.msc > right-click on a Role > Add Resource > select Client Access Point

Input role name and IP > Next

Click Next several more times to complete the wizard. Once a new Client Access Point has been created as a sub-role, SMB shares could be created as follows:
Right-click a role > Add File Share > select the correct Client Access Point > complete the wizard

6) How to Change Virtual FileServer Name
Step 1: Change Server Name
Run Fail-over Cluster Manager > connect to the correct cluster > select Roles > highlight the file server role to be changed > click on “Resources” tab at the bottom > right-click File Server section > Properties > Edit the name > OK
Step 2: Change File server name
Roles > select correct Role > click on Resources tab > right-click on “Name” to change > Edit the name > OK > Confirm
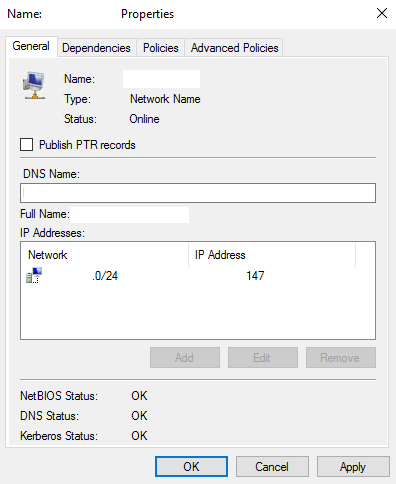
Right-click File Server Name > Edit > Properties

Wait for DNS replication to propagate, then run nslookup [virtual_file_server_name]$serverName="SHERVER008"$allDcs=(Get-ADDomainController -Filter *).Name$allDcs|%{$nonVerbose=nslookup $serverName $_}
7) How to Create Protection Group
Login to Nimble Storage Array > Manage > Data Protection > click on the plus sign “+”

Fill out the blanks as illustrated in the screenshot herein

Next > click Create when Ready > Done
8) How to Restore from HPe Nimble Snapshots
Step 1: Remove volume from Protection Group

Acknowledge the legalese message

Click on Manage > Data Storage > click the target volume > Edit > Next to advance to the Space settings > Next to advance to the Protection Settings > select “No Volume Protection” > Save > select Okay to disassociate… > Make Edits to commit change
Step 2: Delete ‘Orphaned’ Copy

Click on Manage > Data Storage > put a check-mark next to the target volume’s previous replicated copy (should be shown as offline) > click on “X” or “Remove” button > verify that the volume to delete is the orphaned copy > Delete
Step 3: Restore of LUN to a Target Snapshot
Select the correct volume to restore
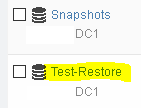
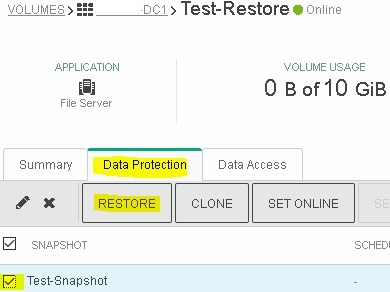
Select Data Protection > put a check-mark next to the desired snapshot > click RESTORE
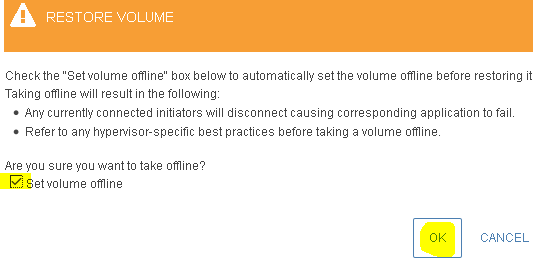
Put a check-mark next to ‘Set volume offline’ > OK
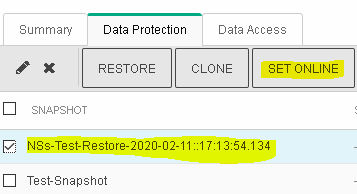
Observe the prompts that indicate snapshot restore being successful

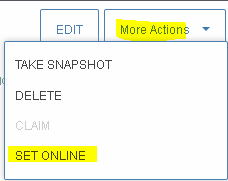
Select the newly generated restore item a the top of the list > SET ONLINE
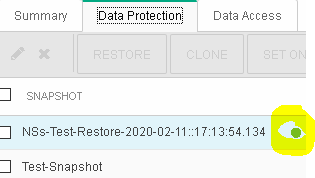
Observe the subtle change that indicates the status of the restored snapshot being active
Click on More Actions > SET ONLINE
9) How to Restore Files Using VSS Snapshots
Method 1:
a. This is the script that controls the behavior of Daily VSS Snapshots:
\\snapshots\FileServerClusters\Daily-VSS-Snapshot.ps1
b. On each of the file server hosts, there exists a scheduled task as shown below

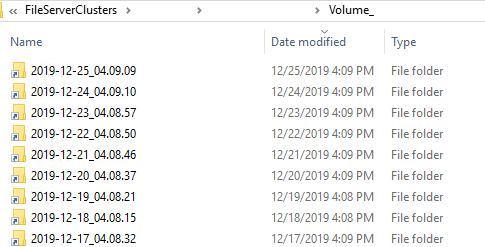
c. Every day, these directories get updated with current shortcuts toward VSS snapshots of volumes on each file server hosts.

d. Previous copies of files on these volumes are arranged by dates
Method 2:
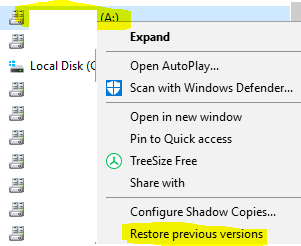
Use Windows Explorer to navigate to a volume > right-click > Restore Previous versions
Select a desired date > Open
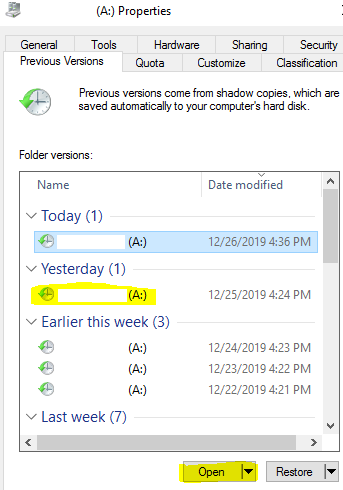
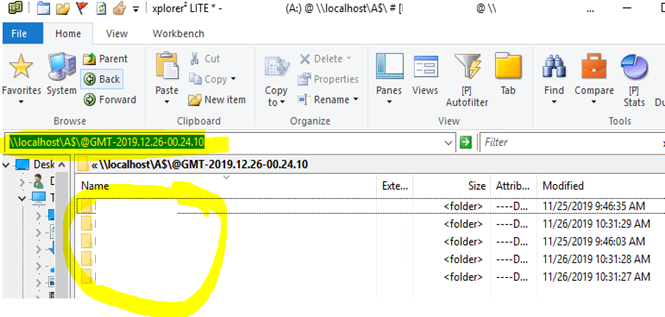
As a new Windows Explorer opens, note the path of this VSS Snapshot (e.g. \\localhost\A$\@GMT-2019.12.26-00.24.10) > discover a back-in-time file to be restored as originally intended
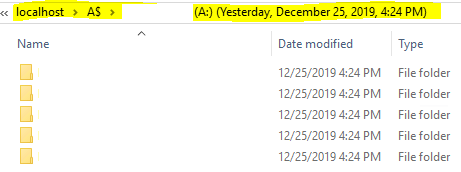
Optional: Windows Explorer in Windows 2016 enforces Client Access List (CAL) of NTFS permissions strictly; hence it may not be possible to browse using a Domain Admin account if such account has not been explicitly given at least “Traverse” and “Read Folder Attributes.” However, it is not easy elevating as Administrator privileges on a local system without using a utility such as xPlorer2 Lite. This utility has been installed on File Server hosts for this purpose. Here is how to use it:
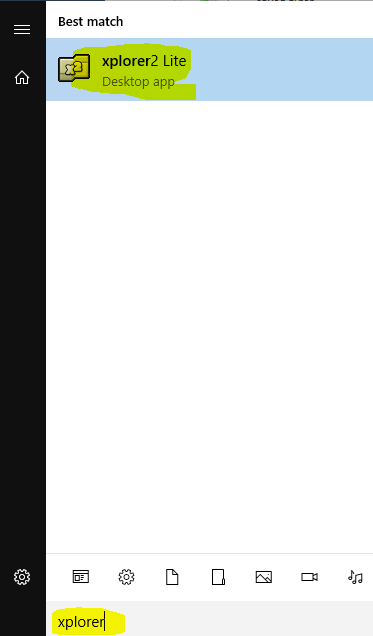
On Windows, click on Start > search for keyword “xplorer” > right-click the resulting app > Run-as Administrator
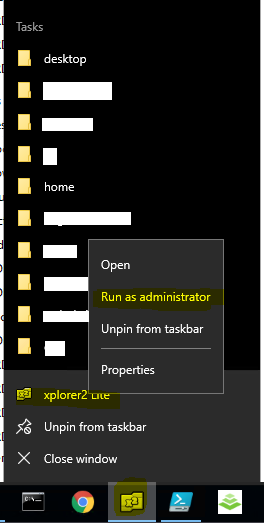
Alternatively, one can locate the icon on the task-bar > right-click > run-as Administrator
The commander view of xPlorer is similar to that of Windows Explorer > paste the path as copied from the previous Windows Explorer view to navigate directories as the Administrator elevated user
10) General Cisco Unity Admin Tasks
A. Check Logs

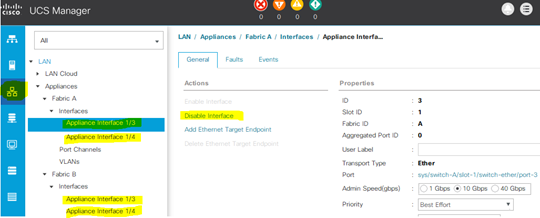
B. Disconnect & Reconnect iSCSI interfaces
Use a modern Internet browser to navigate toward the IP of Cisco UCS in the correct DC
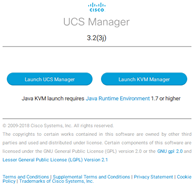
Click on “Launch UCS Manager” > navigate toward Networking > Appliances > select the correct interface > right-click > Disable/Enable Interface as desired
C. Checking Servers for Problems
Login correct DC of Cisco UCS > navigate to Servers > Service Profile > Root > CLUSTER1DC1SV1 > Faults
i. Example of a problem:
— Critical 2020-02-12T13:48:54Z
Affected object : sys/chassis-1/blade-2/fabric-A/path-1/vc-691
Description : ether VIF 691 on server 1 / 5 of switch A down, reason: Error disabled
ii. Example of a resolved fault:
— Cleared/None 2020-02-12T13:50:34Z
Affected object : sys/chassis-1/blade-2/adaptor-1/host-eth-1
Description : Adapter ether host interface 1/5/1/1 link state: down
11) Maintenance Shutdown Routine
- o Stop each role: run cluadmin.msc > Failover Cluster Manager > navigate to {CLUSTERNAME} > Roles > click on each role or Ctrl-A to select all > right-click > Stop Role
- o Pause each node: Failover Cluster Manager > navigate to {CLUSTERNAME} > Nodes > select each node or Ctrl-A to select all > right-click > Pause (Do Not Drain Roles)
- o OPTIONAL: Stop cluster: right-click Cluster Name > More Actions > Shutdown Cluster > OK
- o OPTIONAL: shutdown servers: Servers > Service Profile > Root > select {SERVERLABEL} > Offline > repeat for other server modules
- – Disable ASO (this will not affect the volume protection and replication directions)
- o Access Nimble UI > Administration > Availability > clear the checkmark next to Automatic Switchover > Save
- – Set Volumes Offline
- o Access Nimble UI > Manage > Data Storage > Put a check mark next to one, multiple, or all volumes > click on the three dots ‘…’ (to access the ‘more’ actions menu) > Set Offline > Yes
- – OPTIONAL: Change Replication Direction
- o If DC1 were to be network disconnected, switch Source role to DC2
- o If DC2 were to be network disconnected, switch Source role to DC1
- o If both DC2’s were to be network disconnected, do nothing
- o Instructions:
- Administration > Manage > Data Protection > select a group > click on the three dots ‘…’ (to access the ‘more’ actions menu) > Handover > put a check mark next to ‘Allow handover to proceed’ > OK > repeat for other groups
- Ensure that Arrays are reachable when in maintenance mode (management interfaces are UP)
- – OPTIONAL: shutdown both Arrays ONLY IF Power Outage is expected: Administration > Shutdown > Group or One Array Name (review this message: ‘The selected arrays will be shutdown? After you restart, you must enter the passphrase to access any encrypted volumes present on the array’) > OK
- a. OPTIONAL: stop witness agent: SSH into machine > stop agent
- b. Note: If ASO is disabled at the Nimble Array level, then the Arrays won’t be looking for this witness.
Part B: Online Sequence
1. ASO Witness (located at IMC)
-
- o If applicable, start witness agent: SSH into machine > start agent
2. HPE Nimble Storage Array
-
-
- o If applicable, turn on all Arrays: Physically press the power buttons on both Arrays > access HPe Management UI > Administration > Shutdown > Turn On > Confirm
- o OPTIONAL: If applicable, revert replication direction: Administration > Manage > Data Protection > select a group > click on the three dots ‘…’ (to access the ‘more’ actions menu) > Handover > put a check mark next to ‘Allow handover to proceed’ > OK > repeat for other groups
- o Set volumes online: access Nimble UI > Manage > Data Storage > Put a check mark next to one, multiple, or all volumes > click on the three dots ‘…’ (to access the ‘more’ actions menu) > Set Offline > Yes
- o Re-enable ASO: Access Nimble UI > Administration > Availability > clear the checkmark next to Automatic Switchover > Save
-
- o If applicable, Start Servers: Servers > Service Profile > Root > select {SERVERLABEL} > Offline > repeat for other server modules
- o If applicable, Start Cluster: run cluadmin.msc > > Failover Cluster Manager > navigate to {CLUSTERNAME} > select a cluster or press Ctrl-A to select all > right-click > More Actions > Start Cluster > OK
- o Resume each node: Failover Cluster Manager > navigate to {CLUSTERNAME} > Nodes > select each node or Ctrl-A to select all > right-click > Resume (Fail Roles Back)
- o Start each role: Failover Cluster Manager > navigate to {CLUSTERNAME} > Roles > click on each role or Ctrl-A to select all > right-click > Start Role
- Part C: Background Information
- Stretched VLAN traverses through the CORE
- – iSCSi network is connected to stretched VLAN
- – Data network is also connected to stretched VLAN
- If ONLY iSCSI traffic is cut:
- – Then the volumes go down
- – Server nodes will show errors in LUN reachability
- – Nimble Storage Array controllers will also show errors and Volumes will go offline
- If ONLY data traffic is cut:
- – Then the client access (SMB paths) becomes unavailable
- – Automatic Failover Witness (ASO) will be disabled
- – Nimble Storage Array controllers will also show errors and Volumes will go offline
- If BOTH iSCSI and data traffic is cut in one Data Center:
- – ASO (if enabled) will trigger
- If BOTH iSCSI and data traffic is cut in BOTH Data Center:
- – ASO will NOT trigger
- MS Failover witnesses:
- – \\FILESHERVER007\CLUSTER1$
- -\\FILESHERVER007\CLUSTER2$
12) Miscellaneous Troubleshooting Information
A1. Error: “Chkdsk scan needed on volume”
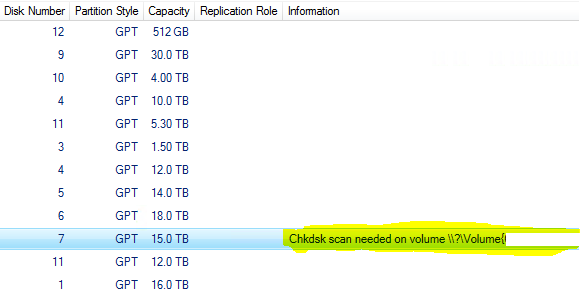
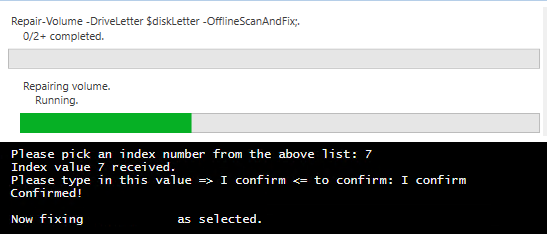
A2. Resolution: Run PowerShell Script (GPL) provided on \\snapshots\FailoverClusters to Fix the Unhealthy Volumes
Sample Output:

Expected progress screen with a duration of approximately 30 minutes for a 10-TB volume
B. Server down: Cluster Node was removed from the active fail-over cluster membership
Error message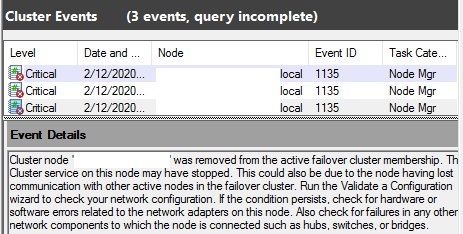
Resolution:
Check for server fault statuses in Cisco UCS (see section on Cisco UCS)
