Step 1: Install certbot-auto
mkdir /etc/letsencrypt
cd /etc/letsencrypt/
wget
chmod a+x certbot-auto
Step 2: Create the Cert
Part (a): run this command to initiate the process
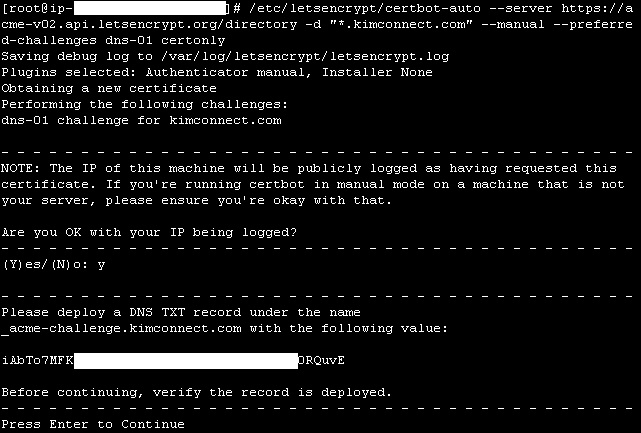
/etc/letsencrypt/certbot-auto certonly –manual -d *.kimconnect.com -d kimconnect.com –preferred-challenges dns-01 –server https://acme-v02.api.letsencrypt.org/directory
The script will pause at the DNS TXT record deployment recommendation to allow the user an opportunity to create this entry within a control panel for the target domain
Sometimes, there’s mistake in command line where the double quotes ” are being transposed into a similarly appearing ” – the fix is to simply to correct the double-quote characters
[[email protected] kimconnect]# /etc/letsencrypt/certbot-auto --server https://acme-v02.api.letsencrypt.org/directory -d "*.kimconnect.com" -d kimconnect.com --manual --preferred-challenges dns-01 certonly

Non-ASCII domain names not supported. To issue for an Internationalized Domain Name, use Punycode.
Part (b): create a TXT record as suggested in the previous output
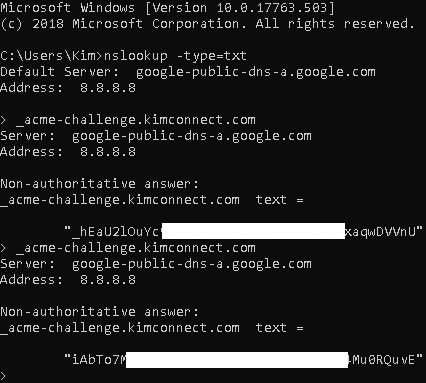
Part (c): ensure that enough time has passed to allow for the newly created TXT record to propagate through the Internet. The sequence to manually monitor this progress goes as follows:
Run CMD:
 nslookup -type=txt
_acme-challenge.kimconnect.com
Wait a few moments… and then query the TXT record again until the result reflects an updated entry. Below is an screenshot to illustrate this activity.
Part (d): proceed to complete the Cert generation script
Although it is beyond the scope of this article, let’s take a look at the process of applying the certificate above to KimConnect.com’s HTTP broker engine (HAProxy).
Search for letsencrypt/live certs as specified in the haproxy configuration file:
[[email protected] kimconnect]# grep '/etc/letsencrypt/live' /etc/opt/rh/rh-haproxy18/haproxy/haproxy.cfg

bind 127.0.0.1:443 ssl crt /etc/letsencrypt/live/kimconnect.com/kimconnect.com.pem accept-proxy
From the result of the grep command above, we can generalize that HAProxy is expecting the cert to be stored at ‘/etc/letsencrypt/live/kimconnect.com/kimconnect.com.pem’. The next step is to combine the fullchain.pem & privkey.pem of the newly generated/renewed SSL cert and place it into the expected directory with these two lines:
DOMAIN='kimconnect.com'
cat /etc/letsencrypt/live/$DOMAIN-0001/fullchain.pem /etc/letsencrypt/live/$DOMAIN-0001/privkey.pem > /etc/letsencrypt/live/$DOMAIN/$DOMAIN.pem
It’s would then become necessary to reload HAProxy to apply the new settings.
systemctl restart rh-haproxy18-haproxy