Overview:
There are several methods of migrating an on premise targeted Microsoft Exchange system, herein referred to simply as the “Exchange,” to Office 365. Exchange Admin Center (EAC) will refer to the Office 365 version of Exchange Online. The most common choice is via Hybrid deployment, meaning enabling a coexistence of Exchange [on premise] and Exchange Online. This method is only available if the Exchange version is 2010 or higher. Please refer to this other article if the Exchange is version 2007 or 2003. Following are the general sequence of execution.
- Discovery & Gathering Prerequisites
- Prepare On Premise Exchange
- Prepare On Premise Active Directory Environment
- Enable Hybrid Mode
- Perform Mailbox Migration
- Configure Office 365 Exchange Features
- Reconfigure Mail Flow
- Decommission On Premise Exchange
- Provide Documentation
- Obtain Business Acceptance of Completion
1. Discovery & Gathering Prerequisites
This is a list of items to be gathered during the Discovery phase:
- Obtain an nmap scan of the Exchange servers. (i.e.
$exchangeServers | foreach {nmap -O -A -sV --version-all $_}) - Determine what version of Exchange is in use
- This can be obtained via a login to the Exchange server and run one of these commands as an Administrator:
# Exchange 2007 & 2010:
Get-Command ExSetup | ForEach {$_.FileVersionInfo}

# Exchange 2013, 2016, 2019:
Get-ExchangeServer | Format-List Name,Edition,AdminDisplayVersion - An nmap output reading may require some deductive reasoning as an exact versioning detection may often be non-explicit from packet captures. Here’s an example: the detected Windows OS is version 2012 > that OS version is known to support Exchange version 2010, 2013, 2016 > the raw output identifies target as Exchange version 2007 or 2010 > therefore, the exchange version must be 2010, as 2007 can safely be precluded basing on the OS version. Here’s a quick compatibility list:
Windows Server 2003: Exchange 2007
Windows Server 2008 SP2: Exchange 2007, Exchange 2010
Windows Server 2008 R2 SP1: Exchange 2007, Exchange 2010, Exchange 2013
Windows Server 2012: Exchange 2010, Exchange 2013, Exchange 2016
Windows Server 2012 R2: Exchange 2010 SP3, Exchange 2013, Exchange 2016
Windows Server 2016: Exchange 2016 CU3 and later
Windows Server 2019: Exchange 2019
- This can be obtained via a login to the Exchange server and run one of these commands as an Administrator:
- What Exchange service packs are already applied? Exchange 2010 SP2 is the minimum required to enable Hybrid Mode. Currently, SP3 is recommended for this release.
- In the case of Exchange 2010, nodes to roles association must be identified. The most typical setup is having 0 or 1 server holds the Edge Transport, and 1 server responsible for Client Access, Hub Transport, and Mailboxes. Unified Messaging is uncommon. Microsoft “strongly recommend[s] that you install all of the roles on each [1] server to provide additional reliability and improved performance.” Here is the list to consider:
- Mailbox Server – hosts the mailbox and public folder databases
- Client Access Server – provides connectivity for clients (eg Outlook, Outlook Web App, ActiveSync) to mailboxes. Office 365 will connect to the server holding this role to initiate migration.
- Hub Transport Server – responsible for all mail flows in the organization
- Edge Transport Server – a special transport server intended for installation in DMZ networks to provide secure inbound/outbound email flow for the organization. A server holding this role cannot host other roles.
- Unified Messaging Server – provides voice mail and other telephony integration with Exchange
-
# Show server with Client Access role
Get-ClientAccessServer

# Show a summary list of all Autodiscover virtual directories in the client access services on all Mailbox servers in the organization.
Get-AutodiscoverVirtualDirectory

# List all accepted domains
Get-AcceptedDomain
Get-AcceptedDomain | Where{$_.DomainType -eq 'Authoritative'}
Get-AcceptedDomain | Where{$_.DomainType -ne 'Authoritative'}

# retrieve the edge synchronization services settings
Get-EdgeSyncServiceConfig "Primary EdgeSync Settings" | Format-List

# View the transport rules
Get-ManagementRole "Transport Rules" | Format-List Name, RoleType
- Is Hybrid mode already enabled previously? If so, locate the Azure AD Connect server
- How many domains are being serviced by Exchange? This can be gathered from the nmap xml.
- Are those certs obtained from a public certificate authority(ies)? If not it is necessary to convert self-signed and/or privately signed domain certs to public certs prior to proceeding.
- For each of domain being discovered, it’s a good idea to perform a MX to IP lookup at https://dnschecker.org/mx-lookup.php. The resulting IPs should match the Public IPs of the on-prem mail servers prior to changes.
- Obtain these credentials
- Username and password to the registrars controlling DNS records of the target domains identified above
- Username and password of a member of the Active Directory Domain Admins & Enterprise Admins groups
- Username and password of a Office 365 Global Administrator account
- If there are email filtering cloud providers such as AppRiver, IPControl, and SpamArrest, access may be necessary toward these platforms. Although, DNS changes may bypass these easily.
- What backup systems are currently being used against Exchange?
- Are then any on-prem or cloud Exchange spam filter appliance already being set for the on-prem environment?
- Is Unified Messaging currently enabled? If so, which version: Skype for business, Skype for business online, or Exchange online?
- How many Office 365 mail-enabled licenses are currently in place? Is that an adequate amount to cover the number of mailboxes to be moved?
2. Prepare On Premise Exchange
Depending the preference of the Business on whether having a flexibility of the Hybrid Mode is important, matching that against the minimum requirement of Exchange 2010 for such mode to determine the option of upgrading the on premise Exchange. For instance, if the organization has been running version 2007. Upgrading it to 2010 prior to migration would make sense if there are 150 mailboxes or more and extended downtime is less tolerated. In general, it will be advisable to the Business to choose the Hybrid Mode migration as controlled changes are necessary for business continuity.
Aside from the upgrading paths, here are the currently recommended patches for each Exchange version:
- Exchange 2019: https://support.microsoft.com/en-us/topic/cumulative-update-1-for-exchange-server-2019-2d113e5c-a7c2-7b84-e90d-3accee36807e
- Exchange 2016:
- Exchange 2013:
- Exchange 2010:
- Exchange 2007:
- Exchange 2003:
3. Prepare On Premise Active Directory Environment
Scenario 1: Single Domain
Scenario 2: Multiple Domains Single Forest
Scenario 3: Multiple Domains Multiple Forests
4. Enable Hybrid Mode
Install Azure AD Connect:
Sign in as an Administrator on a domain joined server > download Azure AD Sync from https://download.microsoft.com/download/B/0/0/B00291D0-5A83-4DE7-86F5-980BC00DE05A/AzureADConnect.msi > double-click AzureADConnect.msi > Continue > Use express settings > input the username and password of the global administrator of the company’s Azure AD > next > input the username and password of the enterprise administrator account > Next > Verify all Active Directory UPN Suffixes if necessary > At the Ready to configure step: uncheck the box next to “Start the synchronization process when configuration completes”; check the box next to “Exchange hybrid deployment” > Install > Exit
Customize Synchronization Container:
Run Syncronization Service Manager > Connectors > select the item representing Active Directory Domain Services > Under Actions, double-click Properties > click on Configure Directory partitions > Containers… > specify username and password of an Enterprise Admin account > OK > select the OU to be synchronized to Office 365 > OK > OK
Run PowerShell Commands to Enable Sync:
# Check Scheduler
Get-ADSyncScheduler

# Enable AD Synch Scheduler
Set-ADSyncScheduler -SyncCycleEnabled $True

# Initiate Sync
Start-ADSyncSyncCycle
Run the Hybrid Configuration Wizard
Limitations: by default, this wizard is designed for a single-forest, single-domain environments. If there are multiple forests and/or domains, preparing verification of additional custom domains will be necessary
Verify custom domains ownership on the Office 365 portal:
Sign into Office 365 as a Global Admin > Setup > Domains > Manage Domains > Add Domain with the + sign > select Specify a domain name and confirm ownership > input the domain name (e.g. kimconnect.com) > Next > choose TXT record method > Next > obtain information provided by wizard
Access registrar’s DNS control panel > create/edit MX record of domain toward Office 365 > wait 15 minutes for propagation and use this example command in Windows to check periodically: nslookup -type=txt kimconnect.com > click Done > click Verify Now > Finish
Repeat the steps above to include any additional domains being serviced by the on premise Exchange.
Office 365 Hybrid Configuration Wizard:
Sign into Office 365 as a Global Admin > EAC > Hybrid > Configure > Download and Install the Configuration Wizard > Run Wizard > Next > either Detect the optimal Exchange server of Specify a Client Access server > Next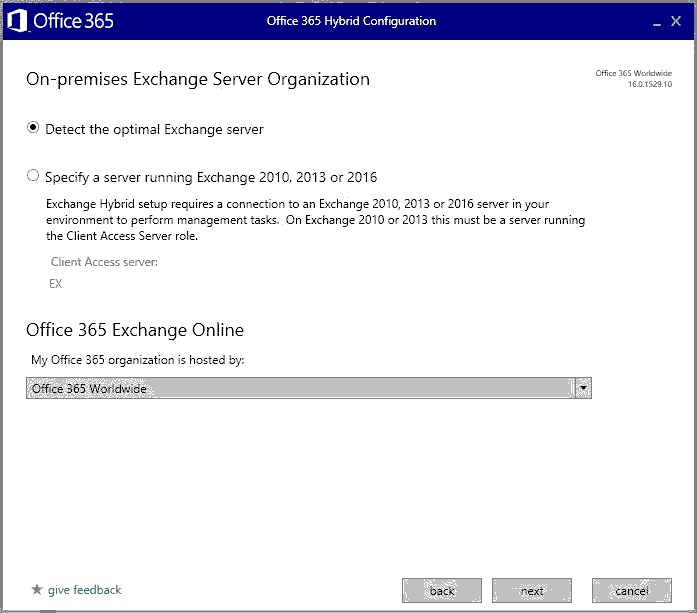
Input Domain Admin & Office 365 Global Admin credentials > Next > wait for the Validation process to complete > next > Enable Federation Trust (a required feature for the full Hybrid deployment) > Copy the Token for the domain and create a TXT record for the domain at the registrar’s DNS control panel > wait about 15 minutes for the new entry to propagate through the Internet – use this example command to check periodically: nslookup -type=txt kimconnect.com > verify that TXT records have been updated > put a check mark next to “I have created a TXT record for each token in DNS” > click “verify domain ownership” > wait for verification process and repeat if necessary > Next
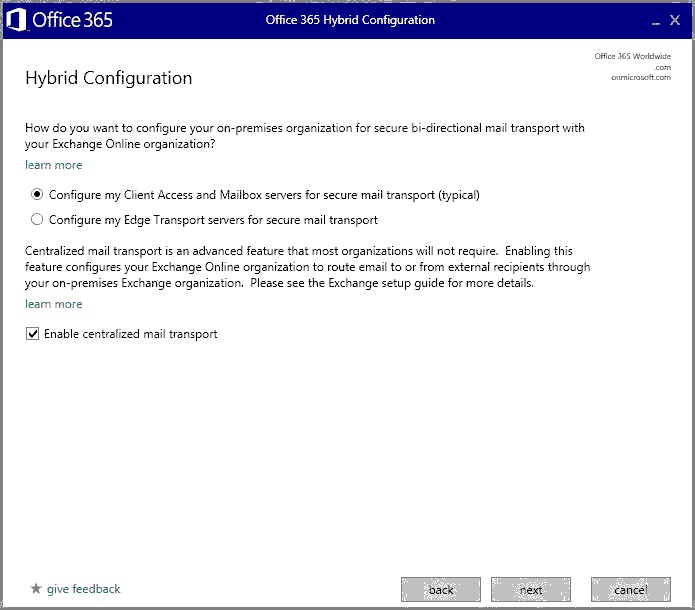
At the Hybrid Configuration step:
- Select “Configure my Client Access and Mailbox server for secure mail transport (typical)” if the Exchange organization does NOT have Microsoft Edge Server
- Select “Configure my Edge Transport servers for secure mail transport” if the Exchange organization does include a Microsoft Edge Server
- Put a check mark next to “Enable centralized mail transport” if the intention is to enable on-premise Exchange to function as a smart host. This means all outbound emails sent from Office 365 have to go through the on-premise server. Do Not check this box if Office 365 will act as the smart host.
Next > At the Receive Server Configuration step: select a reference server to download the certificate. Choose the server which is to receive emails sent from Office 365. That server should have an appropriate SMTP certificate on port TCP/25. Ensure that there is no software or hardware firewall blocking inbound traffic to this server at such port. (Use this tool https://ssl-tools.net/mailservers to check) > Next > Select an appropriate certificate to download 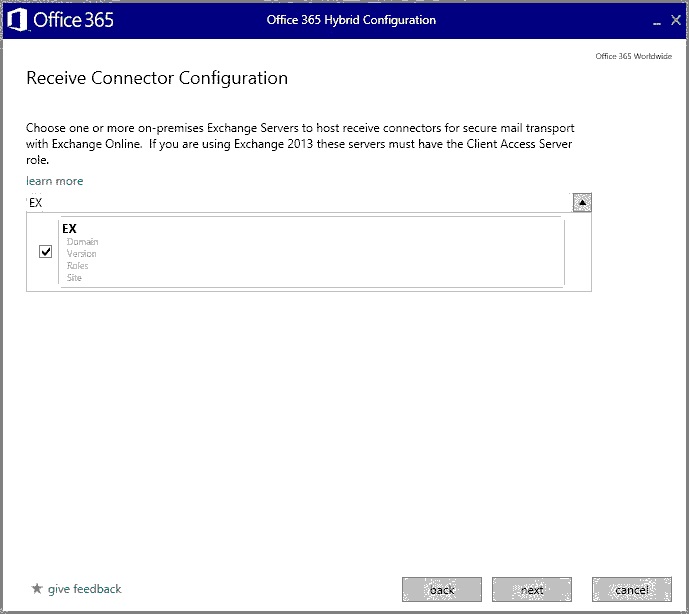
Next > at the Send Connector Configuration step: select the server
- Ensure that NAT policy has been configured to forward Internet traffic toward the Public IP of this server to its Private IP. Necessary ports are TCP/25, TCP/443
- Access registrar’s DNS control panel > create/edit the Sender Policy Framework (SPF) record with an entry in this format:
v=spf1 ip4:<Public_IP_of_On-Prem_Exchange> include:spf.protection.outlook.com ~all - Verify that the PTR record should resolve the IP address to the hostname present in the certificate for SMTP service. The name is usually in format “smtp.kimconnect.com”, or “mail.kimconnect.com”
- Configure the Internal DNS A record of autodiscover.domain.com to point toward the Internal IP of the on premise Exchange server with the Client Access role, as recommended in a Hybrid Exchange configuration. This may also be the same host of mail.domain.com. (except: “Autodiscover DNS records: Configure the Autodiscover public DNS records for your existing SMTP domains to point to an on-premises Exchange 2010/2013 Client Access server or Exchange 2016/2019 Mailbox Server.” ~ . However, in practice, the Public or external DNS record can be pointed to Office 365 (autodiscover-nameast2.outlook.com) as a split-brain with Internal A record without issues.
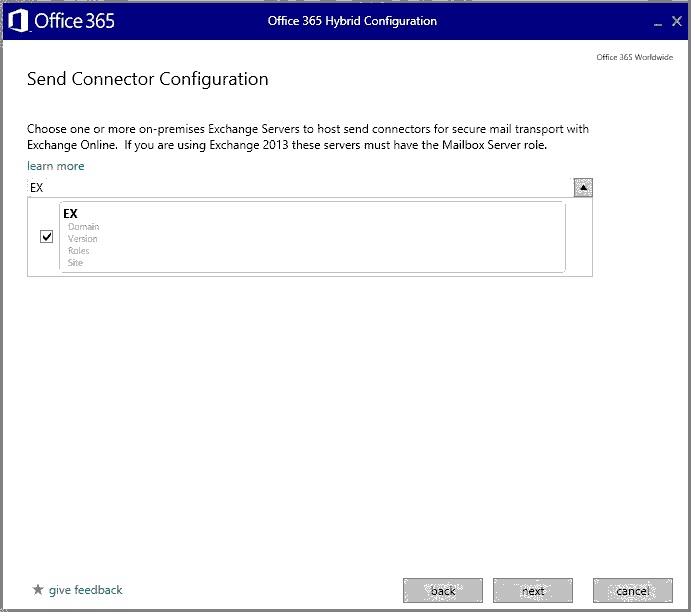
Next > identify the Transport Certificate nodes between Exchange and Office 365 > Next > input a Fully Qualified Domain Name (FQDN). Ensure that TCP/25 and TCP/443 (EWS, OWA) ports have listeners on this IP address. A typical FQDN is mail.kimconnect.com although mail.kimconnect.local will suffice > Next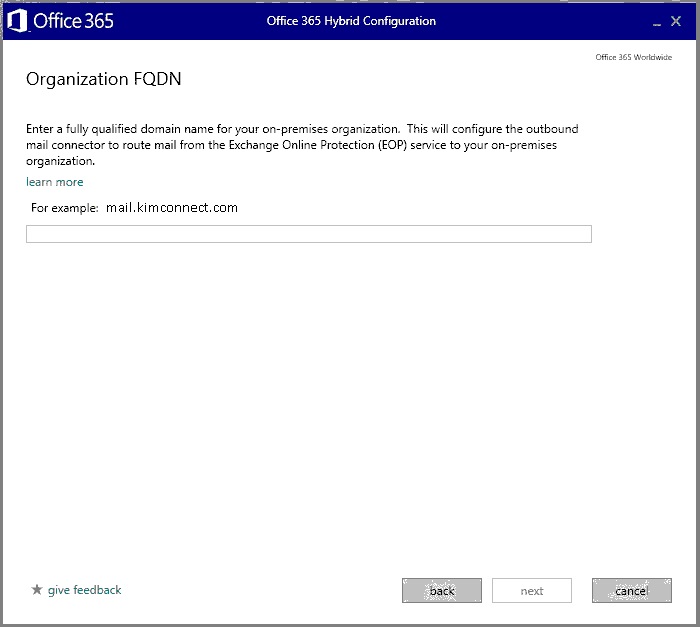
Finishing screen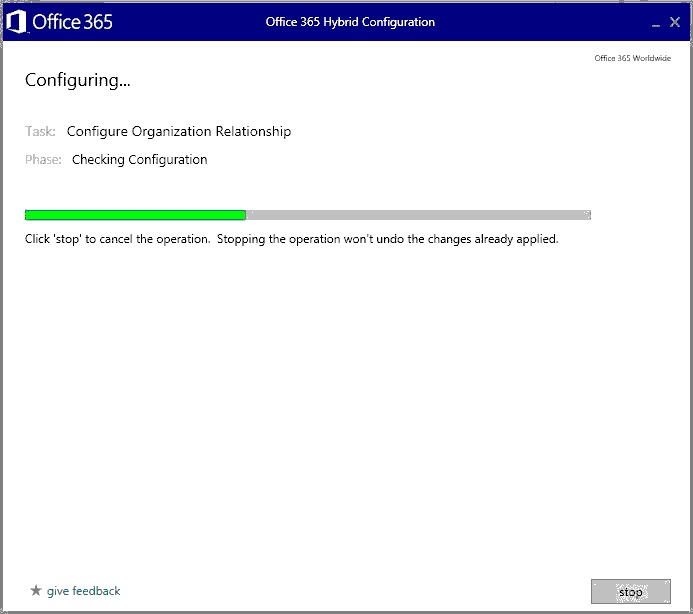
If there are any errors raised by the Wizard, check this log:
%AppData%\Roaming\Microsoft\Exchange Hybrid Configuration
Prepare Office 365 to Accept Relays from On Premise Exchange:
Sign into Office 365 as a Global Admin > EAC > Mail flow > Accepted domains > select the organization’s domain > click on Edit > set “This accepted domain is” to “Internal relay” to accept mail flow from the on-premise Exchange to Office 365
PowerShell command (alternative method):
$domain="kimconnect.com"
Set-AcceptedDomain -Identity $domain -DomainType InternalRelay
Enable SMTP Relay for scanners and custom applications:
EAC > Mail flow > Connectors > click on the + symbol > set From = Partner Organization; set To = Office 365 > Next > set Name = SMTP Relay from on-premise Exchange; set Description = SMTP Relay for on-premise systems and multi-function devices; Turn it on = checked; Retain internal Exchange email headers = checked > Next > click on radio button next to “By verifying that the IP address of the sender server…” > click on the + sign > input the Public IP address of the network where On-Premise Exchange resides > Next > Save
Change the MX Record of Domain:
Access registrar’s DNS control panel > create/edit MX record of domain toward Office 365 using this format <domain>.mail.protection.outlook.com
Verify Office 365 Connectors:
Click on Receive Connectors > verify settings > click on Send Connectors > verify Statuses as Enabled
Deprecated Instructions on Azure:
Create Directory:
Obtain Azure account with “Owner” role > sign into Azure portal (https://portal.azure.com/) > Create a resource > Identity > Azure Active Directory > Organization name = Company Name; Initial domain name = company_domain (which will be appended to onmicrosoft.com) > Create
Add custom domain:
Click Add custom domain or + sign > input company domain name (e.g. kimconnect.com) > Add domain > copy the information provided at the next window for creation of TXT record with the registrar
Create TXT & MX records with registrar:
Access registrar’s DNS control panel > create TXT record with copied inputs of these labels: Alias, Destination, TTL > wait about 5 minutes for the new entry to propagate through the Internet – use this example command in Windows to check periodically: nslookup -type=txt kimconnect.com
Set Sender Policy Record:
Access registrar’s DNS control panel > create/edit the Sender Policy Framework (SPF) record with an entry in this format: v=spf1 ip4:<Public_IP_of_On-Prem_Exchange > include:spf.protection.outlook.com ~all
Verify custom domain:
Navigate back to the pending window of Custom domain name creation > click Verify > repeat until domain is successfully verified
5. Perform Mailbox Migration
Considerations:
- It would be necessary to disable any integrated SMS, UCM, etc. before initiating mailbox migration.
- Non-explicit or Inherited mailbox permissions, and permissions granted to objects that are not mail enabled in Exchange Online, will not be migrated. It is crucial to ensure that all permissions are explicitly granted and all objects are mail enabled prior to migration. Use PowerShell commandlet
Add-RecipientPermissionfor this purpose. - Given that the Hybrid setup has been executed properly, Hybrid migration should not cause disruptions to users. Outlook should autodiscover the new mailbox server entity of Office 365 after an account has successfully migrated. Still it is advisable to perform migration in batches, starting with the most technical savvy users (i.e. IT personnel).
Enable MRSProxy:
The Mailbox Replication Proxy (MRSProxy) service facilitates cross-forest move requests and runs on the remote forest’s Exchange Client Access server. However, by default, MRSProxy is disabled. Here is how to enable it.
EAC > Servers > Virtual Directories > Client Access server > right-click EWS > Edit > put a check mark next to MRS Proxy enabled > Save
Alternative PowerShell command to be executed on an Exchange Client Access server: Set-WebServicesVirtualDirectory -Identity "EWS (Default Web Site)" -MRSProxyEnabled $True
Verify that a mailbox is currently on-premise before the change:
Navigate to https://mail.<domain.ltd>/owa
Verify that targeted mailboxes exist within Exchange:
Microsoft Exchange > Recipient Configuration > Mailbox > locate the mailboxes
Initiate a Sync:
Run PowerShell as Domain Admin on a Server with Azure AD Connect:Start-ADSyncSyncCycle -PolicyType Delta > to monitor sync status, use Synchronization Service Manager UI
Migrate Mailboxes via the GUI method:
EAC > recipients > migration > click the + sign > Migrate o Exchange Online > select Remote move migration > Next > click the + sign > select the account(s) to be migrated > add > OK > Next > Next > input a batch name > select the correct Target delivery domain > Next > Automatically start the batch; Automatically complete the migration batch > new > click on mailboxes > click on the refresh button to monitor progress, expecting migrated mailboxes to eventually appear on the list. Alternatively, this PowerShell Command performs the equivalent: Get-MigrationBatch -Identity $batchName > to cleanup the batch:
Navigate to Recipients > Migrations > click on the completed migration batch > Delete > Yes
Apply licenses:
Once mailbox migration is completed > navigate to the Recipients > select all newly migrated mailboxes > right-click > Edit product licenses > Next > choose Location as USA > set Exchange Online status as On > OK > Close
Verify that mailbox is accessible via Office 365:
Navigate to https://login.microsoftonline.com/common/oauth2/authorize?client_id=00000002-0000-0ff1-ce00-000000000000&redirect_uri=https%3a%2f%2foutlook.office365.com%2fowa%2f&resource=00000002-0000-0ff1-ce00-000000000000&response_mode=form_post&response_type=code+id_token&scope=openid&msafed=1&msaredir=1&client-request-id=d6f712e4-8e0b-c690-dcc7-3082fcfa3760&protectedtoken=true&claims=%7b%22id_token%22%3a%7b%22xms_cc%22%3a%7b%22values%22%3a%5b%22CP1%22%5d%7d%7d%7d&nonce=638636475879321385.58dd735b-4862-46c7-8d7a-ae13e3f0226d&state=Dcs7FoAwCABBos_jYBIIH48TRVtLry_FbLcFANa0pNIyYMqurMPE7WDq7LKLRxjLicOVcOhl6GET59355qcRaZR8t_p-s_4 > login as each of the user account being migrated > test send and receive emails
Verify that the mailboxes no longer exist On-Prem:
Run Exchange Management Console > navigate to Microsoft Exchange > Recipient Configuration > Mailbox > refresh to ascertain that the mailbox labels for the migrated accounts no longer appear on the list > click on Mail Contact > expect to see those migrated account contact labels to appear on this list
PowerShell Migration Scripts:
Calculate Total Storage
$sum=0;
$allMailboxes=Get-Mailbox -ResultSize Unlimited | select Alias;
foreach ($mailbox in $allMailboxes) {
	$mailboxObject = (Get-MailboxStatistics $mailbox.Alias)
	$totalItems=$mailboxObject.TotalItemSize.Value.ToMB();
	$totalDeleted=$mailboxObject.TotalDeletedItemSize.Value.ToMB();
	$sum+=$totalItems+$totalDeleted;
}
$sumGB=$sum/1000;
"Total storage of all mailboxes is $sumGB GBs."
Set Primary SMTP
# This script is to import a prepared CSV file and set the given email address as primary for the account
# Set a batch file with rows set in this format alias,emailaddress (username,[email protected])
$batch1="C:\batch1.csv"
$primarySmtpDomain="kimconnect.org"

Function importExchangeModule{
    $snapinLoaded = (get-pssnapin microsoft.exchange.management.* -ErrorAction SilentlyContinue).Name

    $exchangeVersion=(GCM Exsetup.exe | % {$_.FileVersionInfo}).ProductVersion
    $exchangeVersionMajor=$exchangeVersion.Substring(0,2);
    $exchangeVersionMinor=$exchangeVersion.Substring(3,2);
    $exchangeYear=0;
    if (!($snapinLoaded)){
    switch ([int]$exchangeVersionMajor){
    	6 {
    		$exchangeYear=2003;
    		Add-PSSnapin Microsoft.Exchange.Management.PowerShell.Admin -ErrorAction Continue;
    		break;
    		}
    	8 {
    		$exchangeYear=2007;
    		Add-PSSnapin Microsoft.Exchange.Management.PowerShell.Admin -ErrorAction Continue;
    		break;
    		}
    	14 {
    		$exchangeYear=2010;
    		Add-PSSnapin Microsoft.Exchange.Management.PowerShell.E2010 -ErrorAction Continue;
    		break;
    		}
    	15 {
    		$exchangeYear=2013;
    		Add-PSSnapin Microsoft.Exchange.Management.PowerShell.SnapIn -ErrorAction Continue;
    		}
    	15 {
    		if([int]$exchangeVersionMinor -eq 1){$exchangeYear=2016;}
    		Add-PSSnapin Microsoft.Exchange.Management.PowerShell.SnapIn -ErrorAction Continue;
    		}
    	15 {
    		if([int]$exchangeVersionMinor -eq 2){$exchangeYear=2019;}
    		Add-PSSnapin Microsoft.Exchange.Management.PowerShell.SnapIn -ErrorAction Continue;
    		}
        }
        "Exchange Server $exchangeYear is detected...";
    }

}
cls;
importExchangeModule;

Import-Csv $batch1 | Foreach {
    $item=$_.Name;
    "`nProcessing $item ...";
    $mailbox = Get-Mailbox -Identity $item
    $primaryDomainCurrent=$mailbox.PrimarySmtpAddress.Domain
    if ($primaryDomainCurrent -ne $primarySmtpDomain){
        "Primary SMTP email adddress for this user does not match the desired domain. Updating that now..."
        $mailbox.EmailAddresses += $_.emailaddress
        $mailbox | Set-Mailbox -EmailAddressPolicyEnabled $False -PrimarySmtpAddress $_.emailaddress
    }
    else{
        "Primary SMTP email address is already matching the desired domain. Skipping this record."
    }
}

"Batch processing is completed. Press any key to exit."
cmd /c pause | out-null
Batch Migration:
# This script requires input from the user to obtain Admin credentials to make connections. It will then perform a mailbox migration from on premise Exchange to Office 365 using the predefined migration batches. These batches are expected to be in CSV format. The program also monitors for migration progress. Upon finishing a batch, it will prompt for the user acknowledgement to proceed to the next batch.

# Specify batch files
$migrationBatches="C:\batch1.csv","C:\batch2.csv","C:\batch3.csv"

# Define static end-points
$hybridServer = "hybridserver01.kimconnect.com"
$targetDeliveryDomain = "kimconnect.com.mail.onmicrosoft.com"

# Set scripting execution policy
Set-ExecutionPolicy Unrestricted -Force

# Obtain credentials
$o365AdminCred = get-credential -Message "Enter Exchange Online Admin"
$onPremiseAdminCred = Get-Credential -Message "Enter Local Exchange Migration Admin"

# Establish connection to Office 365
$ExchangeSession = New-PSSession -ConfigurationName Microsoft.Exchange -ConnectionUri "https://outlook.office365.com/powershell-liveid/" -Credential $o365AdminCred -Authentication "Basic" -AllowRedirection
Import-PSSession $ExchangeSession

function monitorCompletion($batchToCheck){
  $migrationStatus=(Get-MigrationBatch -Identity $batchToCheck).Status
  $completed=$migrationStatus -like 'Completed'
  if (!($completed)){
      Write-Host -NoNewline "Waiting for batch $batchX synchronization to complete..."
      $dots=50
      $timeout=10 #10 seconds
      while (!($completed)) {
        $dots-=1;
        #$timeout-=2; # Timeout is optional
        #if($timeout -lt 0){"$timeout seconds have passed. Skip this waiting."; continue;}
        if ($dots -eq 0){Write-Host ".";$dots=50;} # reload dots
        else {Write-Host -NoNewline "."}
        Start-Sleep -s 2
        $completed.Refresh()
        }
    }
  Write-Host "Batch $batchX synchronization is completed."
}

function removeCompletedBatch($batchToRemove){
  Remove-MigrationBatch -Identity $batchToRemove;
}

foreach ($batch in $migrationBatches){
  $batchName=Split-Path $batch -Leaf
  New-MigrationBatch -Name $batchName -SourceEndpoint $sourceEndpoint -TargetDeliveryDomain $targetDeliveryDomain -CSVData ([System.IO.File]::ReadAllBytes($batch));
  monitorCompletion $batchName;
  removeCompletedBatch $batchName;
  Read-Host "batch $batchName is completed. Press [Enter] to begin a next batch."
  pause;
}
Individual Mailbox Migration:
# This script requires input from the user to obtain Admin credentials to make connections and targeted user accounts to migrate. It will then perform a mailbox migration from on premise Exchange to Office 365. The program also monitors for migration progress. Upon finishing a job, it will prompt for a next mailbox to repeat the moving process.

# Set scripting execution policy
Set-ExecutionPolicy Unrestricted -Force

# Define static end-points
$hybridServer = "hybridserver01.kimconnect.com"
$targetDeliveryDomain = "kimconnect.com.mail.onmicrosoft.com"

# Obtain credentials
$o365AdminCred = get-credential -Message "Enter Exchange Online Admin"
$onPremiseAdminCred = Get-Credential -Message "Enter Local Exchange Migration Admin"

# Establish connection to Office 365
$ExchangeSession = New-PSSession -ConfigurationName Microsoft.Exchange -ConnectionUri "https://outlook.office365.com/powershell-liveid/" -Credential $o365AdminCred -Authentication "Basic" -AllowRedirection
Import-PSSession $ExchangeSession

function monitorMove($accountToCheck){
  $moveStatus=(Get-MailboxStatistics $accountToCheck –IncludeMoveHistory).MoveHistory
  $completed=$moveStatus.Status -like "Completed"
  if (!($completed)){
      Write-Host -NoNewline "Waiting for mailbox $accountToCheck move process to complete..."
      $dots=50
      while (!($completed)) {
        $dots-=1;
        if ($dots -eq 0){Write-Host ".";$dots=50;} # reload dots
        else {Write-Host -NoNewline "."}
        Start-Sleep -s 2
        $completed.Refresh()
        }
    }
}

Function cleanupMoves{
  Get-MoveRequest -movestatus completed | remove-moverequest;
}

Function migrateAccount{
  $account = Read-Host "Input user alias or UPN of user mailbox to migrate. Ctrl + C to exit.";
  if ($account){
    New-MoveRequest -Identity $account -Remote -RemoteHostName $hybridServer -TargetDeliveryDomain $targetDeliveryDomain -RemoteCredential $onPremiseAdminCred -BadItemLimit 1000
    monitorMove $account;
    cleanupMoves;
    Read-Host "Mailbox $account migration is completed. Press [Enter] to go to another account. Ctrl + C to exit."
    pause;
    migrateAccount;
  }
}

# Other unused commands
#Get-mailboxstatistics -identity $x -includemovehistory | fl
#Get-MoveRequest | Get-MoveRequestStatistics
Migrate Public Folders:
6. Configure Office 365 Exchange Features
7. Reconfigure Mail Flow
Remove all DNS references of the on-premise Exchange public IPs
Remove Exchange connectors
8. Decommission On-Prem Exchange
Turn off the Exchange servers > disable associated computer accounts in AD > wait 90 days or more > delete computer accounts and associated physical or virtual machines
9. Provide Documentation
Creating new mail-enabled users:
- Using Office 365 portal:
- Using on-premise Active Directory:
Backups and restores
- Using Outlook
- Using Exchange Online
Managing spam filters
- Using Office 365
- Using 3rd party tools
10. Obtain Business Acceptance of Completion
Article to be completed later…