Standard Default Installation Instructions
At the initial loading screen, press the UP arrow to select “Install Red Hat Enteprise Linux 7.5” > Press Enter twice to boot from the installation media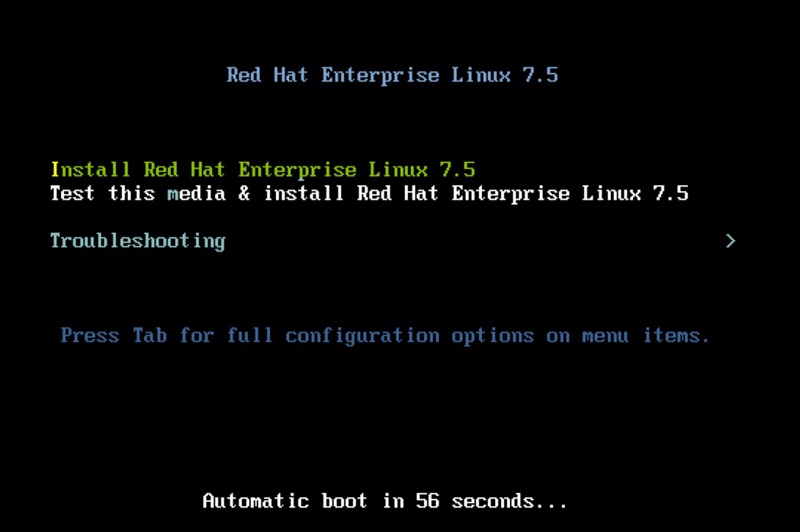
Click Continue to accept the default language settings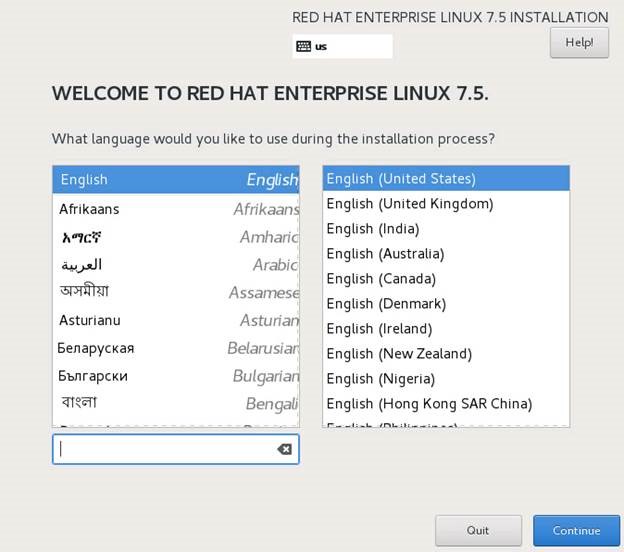
Initial Summary Screen appears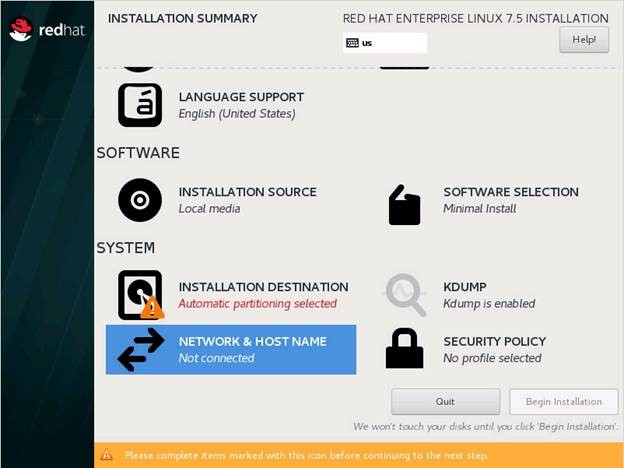
Click on Installation Destination > select the appropriate storage > choose Automatic partitioning > OK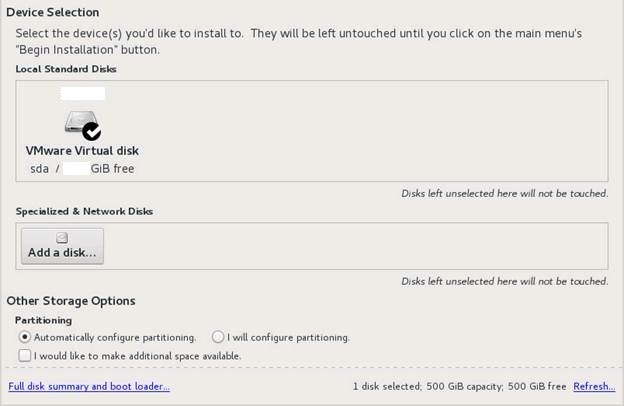
Click on Date & Time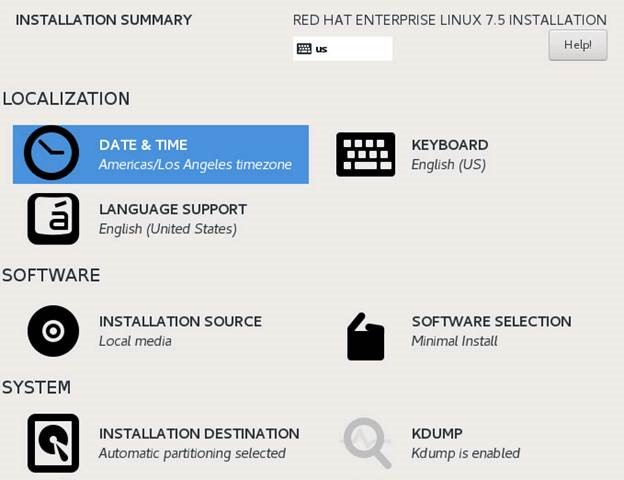
Change the time zone (e.g. Los Angeles)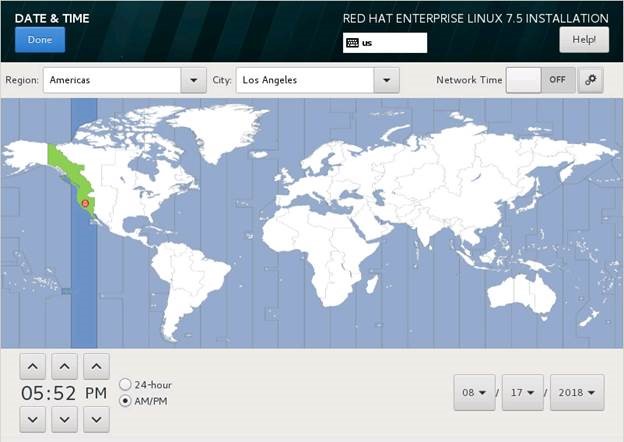
Click on the Network Time configuration button to set the NTP servers > OK when done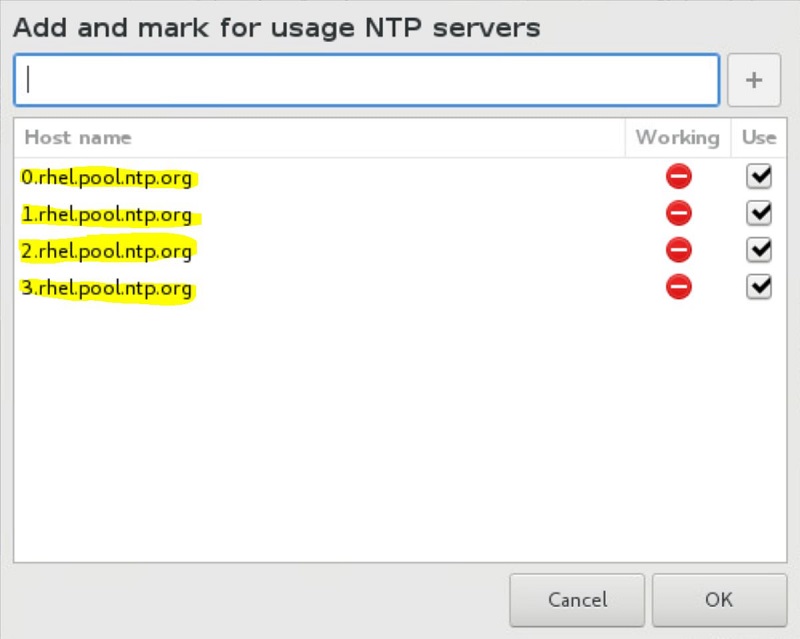
Click on Network & Settings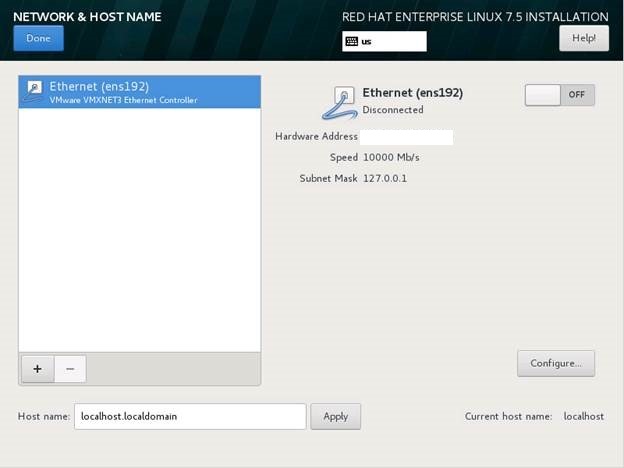
Click on Ethernet and input the appropriate network settings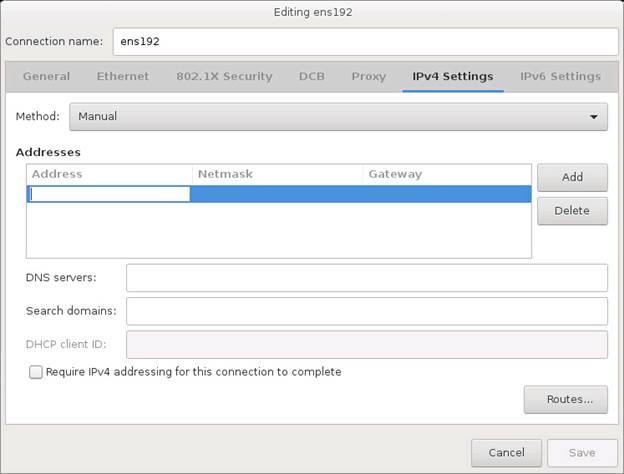
Click Begin Installation to kick start the process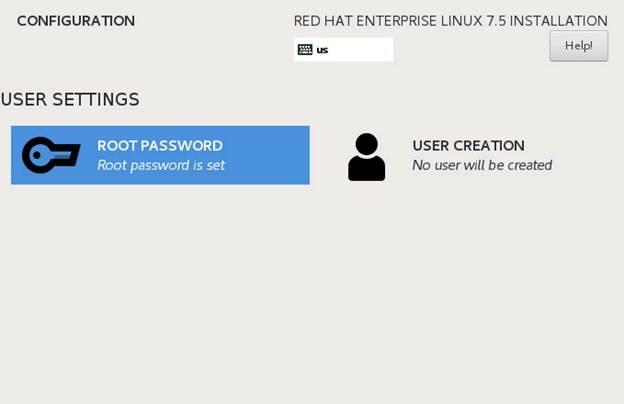
Click Root Password > input a complex password for the root account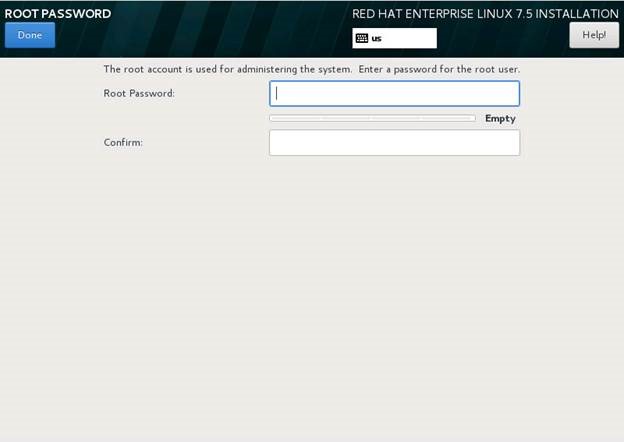
Done > click Reboot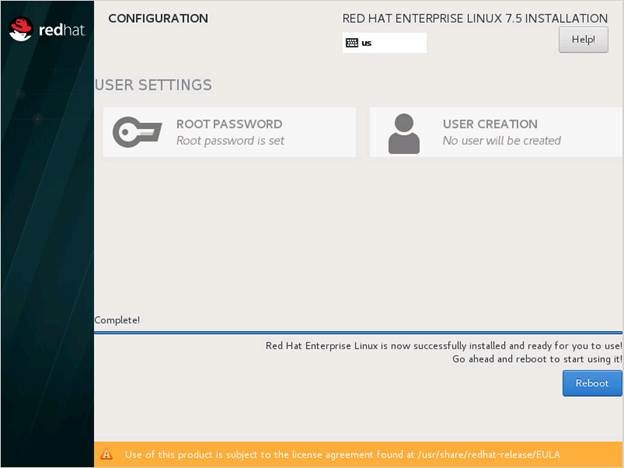
How to manually edit the Network interfaces
List network interfaces: ip a
Edit the primary interface: vi /etc/sysconfig/network-scripts/ifcfg-ens192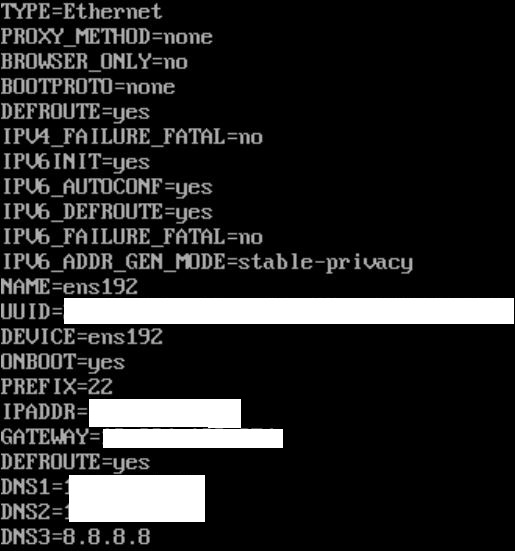
Example of a config:
BOOTPROTO=none #meaning static, not DHCP
ONBOOT=yes #load this interface on boot
PREFIX=24 #network mask
IPADDR=192.168.1.25
GATEWAY=192.168.1.254
DEFROUTE=yes #set this as default route
# DNS SERVERS #
DNS1=192.168.1.254
DNS2=192.168.2.254
DNS3=8.8.8.8
Set NTP Servers manually:
yum install -y ntp ntpdate
systemctl start ntpd
systemctl enable ntpd	#run ntpd daemon at boot
chkconfig ntpdate on	#similar to above method; run ntpdate at boot to trigger 1-time synchronization
ntpdate -u -s 0.north-america.pool.ntp.org 1.north-america.pool.ntp.org 2.north-america.pool.ntp.org 3.north-america.pool.ntp.org
systemctl restart ntpd
hwclock -w
timedatectl set-timezone America/Los_Angeles
Configuring Kerberos Authentication with a Domain:
Configure server to use a proxy:
Linux General Proxy Settings:

# Check current proxy settings
env | grep -i proxy

# Setting Proxy for common protocols, notice the array function being embedded in the command
export {http,https,ftp}_proxy="http://USER:PASSWORD@PROXY_SERVER:PORT"

# Exempt localhost and local domain from proxy traversal
export no_proxy='localhost,127.0.0.1,.kimconnect.com'

Note: special charaters inside passwords must be substituted with ASCII codes (https://blog.kimconnect.com/ascii-characters). For instance, the @ symbol must be replaced by the %40 code. The other method of preceding these with a ` symbol would also work in certain programs.

# Un-setting proxy
unset {http,https,ftp}_proxy

# Configure proxy per user shell to set proxy automatically upon login
vi ~/.bashrc
# Set Proxy
function setproxy() {
    export {http,https,ftp}_proxy="http://PROXY_SERVER:PORT"
}

# Unset Proxy function to be used inside shell scripts
function unsetproxy() {
    unset {http,https,ftp}_proxy
}
Redhat specific configurations:

# yum proxy settings can be set in the file system
vi /etc/yum.conf
## Add these lines to config proxy##
no_proxy='localhost,127.0.0.1,.kimconnect.com'
http_proxy="http://kimconnect:[email protected]:80"
https_proxy="http://kimconnect:[email protected]:80"
ftp_proxy="http://kimconnect:[email protected]:80"

# The easier way to add proxy config lines, using CAT
cat << ENDCAT > /etc/yum.conf
no_proxy='localhost,127.0.0.1,.kimconnect.com'
http_proxy="http://kimconnect:[email protected]:80"
https_proxy="http://kimconnect:[email protected]:80"
ftp_proxy="http://kimconnect:[email protected]:80"
ENDCAT

Reminder: special characters in the password field must be substituted with its HEX value equivalent (https://blog.kimconnect.com/ascii-characters)

# To reverse changes, remove the last 4 lines with this command
head -n -4 /etc/yum.conf
Ubuntu specific configurations:

# Configure proxy settings:
vi /etc/apt/apt.conf
# Proxy settings #
Acquire::http::proxy "http://<user>:<pass>@<proxy>:<port>/";
Acquire::https::proxy "http://<user>:<pass>@<proxy>:<port>/";
# CLI method for ONLY current shell (not other sessions)
export https_proxy=http://<user>:<pass>@<proxy>:<port>/
# All shells
vi ~/.bashrc
# Proxy settings #
Acquire::http::proxy "http://<user>:<pass>@<proxy>:<port>/";
Acquire::https::proxy "http://<user>:<pass>@<proxy>:<port>/";
Setting Hostname in Linux:
The universal method:
# Set hostname and Fully Qualified Domain Name (FQDN or transient)
hostname web001.kimconnect.com

# Append a hostname entry into the hostname file.
echo "web001" >> /etc/hostname

# Append a redundant entry into the hosts file
echo "172.0.1.1  web001.kimconnect.com web001" >> /etc/hosts

# Check result FQDN
hostname -A

# Check hostname (only)
hostname -f
Systemd method:
According to Redhat,
The hostnamectl tool is provided for administering the three separate classes of host names in use on a given system. The three classes of
hostnameare: static, pretty, and transient.The static host name is the traditionalhostname, which can be chosen by the user, and is stored in the/etc/hostnamefile. The “transient”hostnameis a dynamic host name maintained by the kernel. It is initialized to the static host name by default, whose value defaults to “localhost”. It can be changed byDHCPormDNSat runtime. The prettyhostnameis a free-form UTF8 host name for presentation to the user.
# View hostnames
hostnamectl status
# OR
cat /etc/hostname

# Set hostname
hostnamectl set-hostname web001.kimconnect.com

# Reset hostname daemon to apply changes
systemctl restart systemd-hostnamed
Reminder:
After a hostname is changed, it’s necessary to restart hostname daemon to realize the changes. It’s common to reboot the server, but that’s overkill for the purpose of setting the server alias. Here’s a view of this sequence:
Check current names: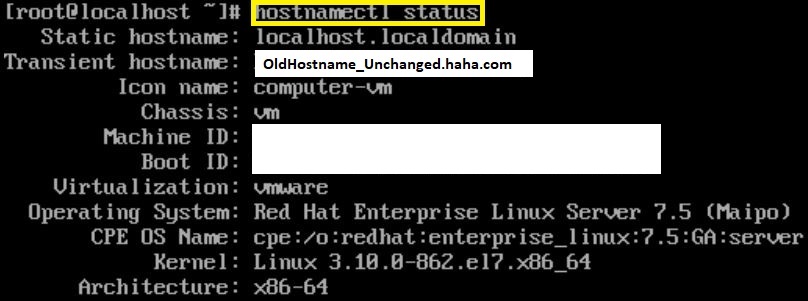
Apply a new label and reset the daemon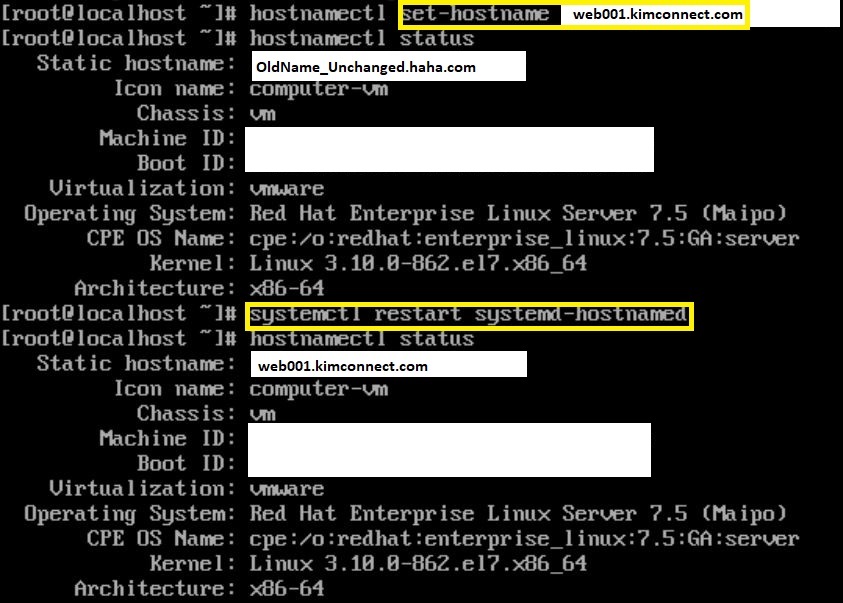
More information:
- The
hostnamectlcommand only writes to/etc/hostname - The
hostnamecommand does not write to/etc/hostname, contrary to expectation - Some Linux Admins prefer to append a line to
/etc/hostswith the FQDN such as192.168.168.168 web001.kimconnect.com web001172.0.1.1 web001.kimconnect.com web001
Redhat Registration
Initial installation of Red Hat requires that its copy be registered with an entitlement server. Otherwise, the yum update command would return an error such as “this system is not registered with an entitlement server. You can use subscription-manager to register.”
To resolve this issue, first one must verify whether this instance subscription status is active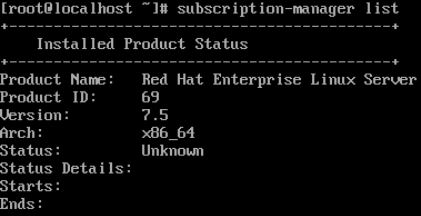
To subscribe, issue this command:subscription-manager register --username <username> --password <password> --auto-attach
Dealing with Repositories
If the system has multiple repositories enabled, it is important to set priorities on these repos so that important ones are always preferred by the system during yum update or install.
# Install yum priorities and edit it
yum install yum-priorities
vi /etc/yum/pluginconf.d/priorities.conf

## Recommended settings ##
[base], [addons], [updates], [extras] ... priority=1
[epel],[contrib] … priority=2
[rpmforce],[other_3rd_parties] ... priority range: 3 to 99
Typical Redhat Server Setup
a. Change root password
b. Create users
c. Register server with Redhat
d. Install packages
- yum groupinstall "Server with GUI" "X Window System" "Fonts"
- yum install glib.i686
- yum install telnet
- yum install syslog
- yum install cifs-utils
e. Configure syslog
– Update /etc/syslog.conf
– restart syslogd
– set syslogd to autostart
f. set dns
– Update /etc/resolv.conf
g. Enable NTP
h. Enable SNMPd
i. Active Directory intergration
– Join domain:
#realm join kimconnect.org -u (username for domain)
#realm join kimconnect.org -u "linux-srv"
#User must be in Linux_XXX_Root group to add the server to the domain
– Test
#id [email protected]
– Deny all users
#Realm deny --all
– Add groups
# realm permit -g [email protected]
# realm permit -g [email protected]
j. Set SSHd to not require FQDNs
– Edit sssd.conf: use_fully_qualified_names = False
– Restart sshd
– Test SSH access remotely to validate config
k. Configure sudoers file
%kimconnect.org\\Linux_Prod_Root ALL=(ALL) ALL
l. Install backup agent
m. Add node to snmp monitoring (e.g. SolarWinds)