Introduction:
Update: we have provided a practical application of the knowledge conveyed in this article with a new document on How to Deploy Pihole in Kubernetes here.
Now continuing with the contents of this blog…
One of the first questions for container storage provisioning is ‘why NFS? ‘ The answer to such inquiries is almost always ‘it depends.’ Here’s an overview of common storage protocols to determine the appropriate type for a Kubernetes system:
SMB/CIFS
– Abbreviation: SMB is Server Messaging Protocol/Common Internet File System
– Ports: 137/UDP 138/TCP 139/TCP 445/TCP
– Very chatty protocol – ideal for Windows environment
– More secured than NFS. Provides some security features
– Less scalable, ‘normal’ speed, and complex to setup (in Linux environments)
NFS
– Abbreviation: Network File System
– Ports: 111/TCP 111/UDP 2049/TCP 2049/UDP 1110/TCP 1110/UDP 4045/TCP 4045/UDP
– Less chatty – ideal for Linux environments
– Not a secured protocol – IP filtering is required as an access barrier as there are no username/password authentications
– Very scalable, fast, easy to setup
iSCSI
– Abbreviation: Internet Small Computer System Interface
– Ports: 860/TCP 860/UDP 3260/TCP 3260/UDP
– Less chatty – ideal for dedicated subnets for storage communcations
– Secured protocol – IP filtering as well as CHAP authentication (username/password)
– Less scalable, fast, more complex to setup (with networking knowledge necessary)
Step 0: Prepare Network File System (NFS) Share
There are many vendors of network storage appliances available on the market, many of which would support iSCSI, CIFS/SMB, NFS, FTP, SFTP, and even Rsync. Instructions on how to create a new NFS share would vary on each of those appliances.
In this example, we’re using OpenMediaVault (OVM), a derivative of FreeNAS with a difference in base OS of Debian Linux vs FreeBSD. Here’s a screenshot of a NFS share from within the OVM interface.
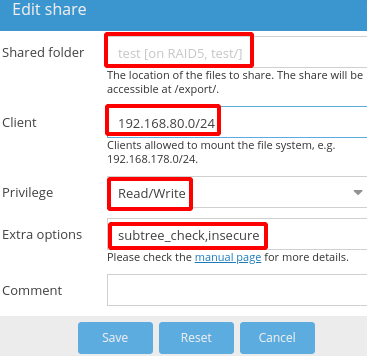
The important note here is that such a share would be set at the OS layer with Access Control List (ACL) of 750 (with nfs daemon as the owner) or 777 (world access) to enable read/write access. Moreover, NFS permissions would be RW,subtree_check,insecure with client access allowed from the subnet where the external IP of the Kubernetes cluster would ingress/egress. That would be the same network as the worker nodes (e.g. 192.168.80.0/24, an arbitrary private subnet to be configured in this lab for K8)
Step 1: Test the NFS Share Access On Each Node
# Install prerequisite on the Master node
sudo apt-get install nfs-common

# Set variables
nfsShare=test # assuming that the 'test' share has already been created on the server
nfsServer=NasServerNameOrIP
mountPoint=/mnt/test
sudo mkdir $mountPoint
sudo mount -t nfs $nfsServer:/$nfsShare $mountPoint

# Example of success
# Nothing, no feedback output from CLI

# Example of failure which will require fixing the file share on the NFS server
brucelee@controller:$ sudo mount -t nfs $nfsServer:/$nfsShare $mountPoint
mount.nfs: access denied by server while mounting FILESERVER:/test
# Create an index file to be used by NGINX - Do this only once
echo "NFS Persistent Volume Test in Kubernetes is Successful!" >> $mountPoint/index.html
cat $mountPoint/index.html

# Example of success
brucelee@controller:/mnt$ cat $mountPoint/index.html
NFS Persistent Volume Test in Kubernetes is Successful!
Step 2: Create Storage Class Name ‘nfs-class’
# Check storage classes - default installation of K8 will have no custom storage classes
kim@linux01:~$ kubectl get storageclasses
No resources found

# Create custom storage class - this will fail if nfs-class has already been manually created prior, which is a desired outcome.
storageClassName=nfs-class
cat > $storageClassName.yaml <<EOF
kind: StorageClass
apiVersion: storage.k8s.io/v1
metadata:
  name: $storageClassName
provisioner: kubernetes.io/nfs
reclaimPolicy: Retain
allowVolumeExpansion: true
EOF
kubectl apply -f $storageClassName.yaml
Step 3: Create a Persistent Volume
# Set variables
pvName=test-nfs-volume
storageClassName=nfs-class
storageSize=100Gi
nfsServer=192.168.80.80
nfsShare=test

# Create yammal file
cat > $pvName.yaml << EOF
apiVersion: v1
kind: PersistentVolume
metadata:
  name: $pvName
spec:
  storageClassName: $storageClassName
  capacity:
    storage: $storageSize
  accessModes:
  - ReadWriteMany
  nfs:
    path: /$nfsShare
    server: $nfsServer
  persistentVolumeReclaimPolicy: Retain # Other options: Recycle = rm -rf /test/* , Delete = eteled
EOF

# Apply the thing
kubectl apply -f $pvName.yaml
Step 4: Create a Persistent Volume Claim
pvClaimName=test-nfs-claim
storageClassName=nfs-class
claimSize=100Gi
cat > $pvClaimName.yaml << EOF
apiVersion: v1
kind: PersistentVolumeClaim
metadata:
  name: $pvClaimName
spec:
  storageClassName: $storageClassName
  accessModes:
  - ReadWriteMany
  resources:
    requests:
      storage: $claimSize
EOF
kubectl apply -f $pvClaimName.yaml
Step 5: Create Deployment Plan
# Set variables
deploymentName=test-nfs-deployment
replicas=2
appName=test
imageSource=nginx:alpine
containerPort=80
containerMountPath=/usr/share/nginx/html
pvName=test-nfs-volume
pvClaimName=test-nfs-claim

# Create deployment file
cat > $deploymentName.yaml << EOF
kind: Deployment
apiVersion: apps/v1
metadata:
  name: $deploymentName
spec:
  replicas: $replicas
  selector:
    matchLabels:
      app: $appName # This must be identical to the pod name (template label)
  strategy:
    type: RollingUpdate
    rollingUpdate:
      maxSurge: 1
      maxUnavailable: 1
  template:
    metadata:
      labels:
        app: $appName
    spec:
      hostNetwork: true # This allows a direct ingress to any node. When this value is set, the container must not be binding to ports that are in use by the worker nodes (e.g. 53/tcp 53/udp for dns)
      containers:
      - name: $appName
        image: $imageSource
        ports:
          - containerPort: $containerPort
            name: $appName
        volumeMounts:
          - mountPath: $containerMountPath
            name: $pvName # this must matches volume name
      volumes:
        - name: $pvName
          persistentVolumeClaim:
            claimName: $pvClaimName
EOF

# Apply deployment plan
kubectl apply -f $deploymentName.yaml
Step 6: Implement MetalLB Load Balancer
# Set strictARP, ipvs mode
kubectl get configmap kube-proxy -n kube-system -o yaml | \
sed -e "s/strictARP: false/strictARP: true/" | sed -e "s/mode: \"\"/mode: \"ipvs\"/" | \
kubectl apply -f - -n kube-system

# Apply the manifests provided by the author, David Anderson (https://www.dave.tf/) - an awesome dude
kubectl apply -f https://raw.githubusercontent.com/metallb/metallb/v0.9.5/manifests/namespace.yaml
kubectl apply -f https://raw.githubusercontent.com/metallb/metallb/v0.9.5/manifests/metallb.yaml
# On first install only
kubectl create secret generic -n metallb-system memberlist --from-literal=secretkey="$(openssl rand -base64 128)"

# Sample output:
brucelee@controller:~$ kubectl apply -f https://raw.githubusercontent.com/metallb/metallb/v0.9.5/manifests/namespace.yaml
namespace/metallb-system created
brucelee@controller:~$ kubectl apply -f https://raw.githubusercontent.com/metallb/metallb/v0.9.5/manifests/metallb.yaml
podsecuritypolicy.policy/controller created
podsecuritypolicy.policy/speaker created
serviceaccount/controller created
serviceaccount/speaker created
clusterrole.rbac.authorization.k8s.io/metallb-system:controller created
clusterrole.rbac.authorization.k8s.io/metallb-system:speaker created
role.rbac.authorization.k8s.io/config-watcher created
role.rbac.authorization.k8s.io/pod-lister created
clusterrolebinding.rbac.authorization.k8s.io/metallb-system:controller created
clusterrolebinding.rbac.authorization.k8s.io/metallb-system:speaker created
rolebinding.rbac.authorization.k8s.io/config-watcher created
rolebinding.rbac.authorization.k8s.io/pod-lister created
daemonset.apps/speaker created
deployment.apps/controller created
brucelee@controller:~$ kubectl create secret generic -n metallb-system memberlist --from-literal=secretkey="$(openssl rand -base64 128)"
secret/memberlist created

# Customize for this system
ipRange=192.168.1.80-192.168.1.89
loadBalancerFile=metallb-config.yaml
cat > $loadBalancerFile << EOF
apiVersion: v1
kind: ConfigMap
metadata:
  namespace: metallb-system
  name: config
data:
  config: |
    address-pools:
    - name: default
      protocol: layer2
      addresses:
      - $ipRange
EOF
kubectl apply -f $loadBalancerFile

# Sample output
brucelee@controller:~$ kubectl apply -f $fileName
configmap/config created
Step 7: Create a Service Cluster
serviceName=test-service
appName=test
nodePort=30000
containerPort=80
servicePort=80
cat > test-service.yaml << EOF
apiVersion: v1
kind: Service
metadata:
  name: $serviceName
spec:
  type: LoadBalancer # Other options: ClusterIP, LoadBalancer
  selector:
    app: $appName # This name must match the template.metadata.labels.app value
  ports:
  - protocol: TCP
    port: $servicePort
    targetPort: $containerPort
    # nodePort: $nodePort # optional field: by default, Kubernetes control plane will allocate a port from 30000-32767 range
EOF
kubectl apply -f test-service.yaml
clusterIP=$(kubectl get service test-service --output yaml|grep 'clusterIP: '|awk '{print $2}')
echo "clusterIP: $clusterIP"
curl $clusterIP
kubectl get service test-service
Troubleshooting
A) Pod stuck in ContainerCreating status

brucelee@controller:~$ k get pod
NAME                                   READY   STATUS              RESTARTS   AGE
test-nfs-deployment-54b78bc4c6-4pdz8   0/1     ContainerCreating   0          86s
test-nfs-deployment-54b78bc4c6-sgbw8   0/1     ContainerCreating   0          86s

brucelee@controller:~$ kubectl describe pods
--- Truncated for brevity ---
Events:
  Type     Reason       Age                From               Message
  ----     ------       ----               ----               -------
  Normal   Scheduled    4m9s               default-scheduler  Successfully assigned default/test-nfs-deployment-54b78bc4c6-sgbw8 to linux03
  Warning  FailedMount  2m6s               kubelet            Unable to attach or mount volumes: unmounted volumes=[test-nfs-volume], unattached volumes=[test-nfs-volume default-token-bdhxv]: timed out waiting for the condition
  Warning  FailedMount  2m (x9 over 4m8s)  kubelet            MountVolume.SetUp failed for volume "test-nfs-volume" : mount failed: exit status 32
Mounting command: mount
Mounting arguments: -t nfs 192.168.100.21:/test /var/lib/kubelet/pods/8aa113c6-1b1e-4329-ad37-f9f04fd72e78/volumes/kubernetes.io~nfs/test-nfs-volume
Output: mount: /var/lib/kubelet/pods/8aa113c6-1b1e-4329-ad37-f9f04fd72e78/volumes/kubernetes.io~nfs/test-nfs-volume: bad option; for several filesystems (e.g. nfs, cifs) you might need a /sbin/mount.<type> helper program.

Resolution:
- Check on the NFS server share to ensure that its been set with RW,insecure and such folder has been set with at least 750 permissions (777 preferred)
- Check the Pod Deployment template:spec:hostNetwork: true has been set
- Run this on each node: sudo apt-get install nfs-common

B) Error when the name of spec:containers:volumeMounts.name doesn't match spec:volumes:name

The Deployment is invalid: spec.template.spec.containers[0].volumeMounts[0].name: Not found:

C) Error when no storage class 'nfs-class' has NOT been defined

brucelee@controller:~$ k describe persistentvolumeclaims
Name:          test-nfs-claim
Namespace:     default
StorageClass:  nfs
Status:        Pending
Volume:
Labels:        <none>
Annotations:   <none>
Finalizers:    [kubernetes.io/pvc-protection]
Capacity:
Access Modes:
VolumeMode:    Filesystem
Used By:       test-nfs-deployment-6d4bff899f-5t2m2
               test-nfs-deployment-6d4bff899f-kds6l
Events:
  Type     Reason              Age                      From                         Message
  ----     ------              ----                     ----                         -------
  Warning  ProvisioningFailed  4m21s (x763 over 3h14m)  persistentvolume-controller  storageclass.storage.k8s.io "nfs" not found
Step 8: Cleanup
# Cleanup: must be in the correct sequence!
kubectl delete services test-service
kubectl delete deployment test-nfs-deployment
kubectl delete persistentvolumeclaims test-nfs-claim
kubectl delete pv test-nfs-volume