1. Installation
– Run these commands:
# sudo apt-get install gamin -y
sudo curl -sSL https://raw.githubusercontent.com/pi-hole/pi-hole/master/automated%20install/basic-install.sh | bash
– Possible problem: lighttpd service not running (when gamin has not been preinstalled)
– Fix: run these commands
sudo pihole uninstall
rambo@pihole:~$ sudo pihole uninstall
[?] Are you sure you would like to remove Pi-hole? [y/N] y
[✓] Root user check
[✓] Update local cache of available packages
[i] Existing PHP installation detected : PHP version 7.4.3
[i] Be sure to confirm if any dependencies should not be removed
[i] The following dependencies may have been added by the Pi-hole install:
dhcpcd5 git iproute2 whiptail dnsutils cron curl iputils-ping lsof netcat psmisc sudo unzip wget idn2 sqlite3 libcap2-bin dns-root-data libcap2 lighttpd php7.4-common php7.4-cgi php7.4-sqlite3 php7.4-xml php7.4-json php7.4-intl
[?] Do you wish to go through each dependency for removal? (Choosing No will leave all dependencies installed) [Y/n] n
[✓] Removed Web Interface
[✓] Removed /etc/cron.d/pihole
[✓] Removed lighttpd configs
[✓] Removed config files
[i] Removing pihole-FTL...Failed to stop pihole-FTL.service: Unit pihole-FTL.service not loaded.
sudo apt-get update -y
sudo apt-get upgrade -y
sudo apt purge lighttpd -y
#sudo pihole -r
#useradd -G pihole pihole
sudo apt-get install gamin -y
curl -sSL install.pi-hole.net | sudo bash
2. Follow the wizard to complete the installation
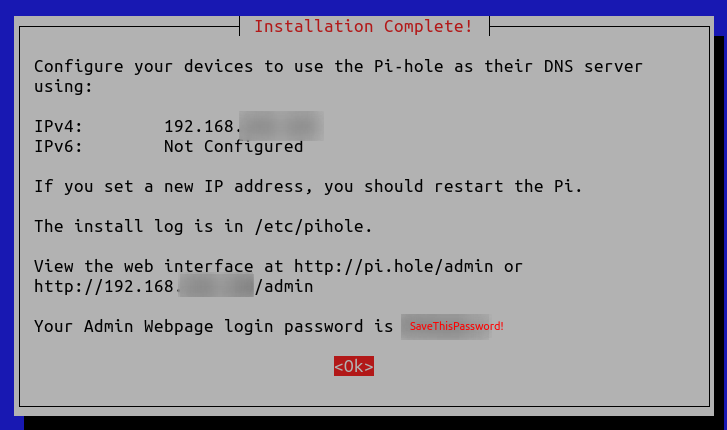
Hint: simply by pressing enter or <ok >repeatedly until reaching this screen
3. Configure firewall
# Adding firewall rules per pihole prerequites https://docs.pi-hole.net/main/prerequisites/
#sudo iptables -I INPUT -p tcp --dport 53 -j ACCEPT
#sudo iptables -I INPUT -p udp --dport 53 -j ACCEPT
#sudo iptables -I INPUT -p udp --dport 67 -j ACCEPT
sudo iptables -I INPUT -p tcp --dport 80 -j ACCEPT
sudo iptables -I INPUT -p tcp --dport 4711 -j ACCEPT
sudo iptables -I INPUT -p tcp --dport 4712 -j ACCEPT
sudo iptables -I INPUT -p tcp --dport 4713 -j ACCEPT
sudo iptables -I INPUT -p tcp --dport 4714 -j ACCEPT
sudo iptables -I INPUT -p tcp --dport 4715 -j ACCEPT
sudo iptables -I INPUT -p tcp --dport 4716 -j ACCEPT
sudo iptables -I INPUT -p tcp --dport 4717 -j ACCEPT
sudo iptables -I INPUT -p tcp --dport 4718 -j ACCEPT
sudo iptables -I INPUT -p tcp --dport 4719 -j ACCEPT
sudo iptables -I INPUT -p tcp --dport 4720 -j ACCEPT
sudo ip6tables -I INPUT -p udp --dport 547 -j ACCEPT

# DHCP Server:
sudo iptables -I INPUT -p tcp --dport 67 -j ACCEPT
sudo iptables -I INPUT -p udp --dport 67 -j ACCEPT

# DHCP client/relay
sudo iptables -I INPUT -p tcp --dport 68 -j ACCEPT
sudo iptables -I INPUT -p udp --dport 68 -j ACCEPT

# DHCP Failover partners
sudo iptables -I INPUT -p tcp --dport 647 -j ACCEPT

# DNS
sudo iptables -I INPUT -p tcp --dport 53 -j ACCEPT

# Grant Pihole TCP:53 access to localhost
sudo iptables -A INPUT -s 127.0.0.0/8 -p tcp -m tcp --dport 53 -j ACCEPT

# Allowing a traffic from a certain subnet
iptables -A INPUT -s 10.10.10.0/22 -j ACCEPT
# iptables -D INPUT -s 10.10.10.0/22 -j ACCEPT # Reverse previous command

# Save firewall rules
sudo sh -c "iptables-save > /etc/iptables/rules.v4"
sudo sh -c "ip6tables-save > /etc/iptables/rules.v6"
# Fixing startup conflicts between iptables & netfilter-persistent
# sudo systemctl edit netfilter-persistent.service
vim /etc/systemd/system/netfilter-persistent.service.d/iptables.conf
### Verify this content ###
[Unit]
Conflicts=iptables.service ip6tables.service

### Modify content and save file ###
[Unit]
After=iptables.service ip6tables.service ufw.service
4. Check service status
rambo@pihole:~$ service lighttpd status
● lighttpd.service - Lighttpd Daemon
Loaded: loaded (/lib/systemd/system/lighttpd.service; enabled; vendor preset: enabled)
Active: active (running) since Fri 2020-12-04 22:43:12 PST; 10min ago
Main PID: 32359 (lighttpd)
Tasks: 6 (limit: 4615)
Memory: 10.0M
CGroup: /system.slice/lighttpd.service
├─32359 /usr/sbin/lighttpd -D -f /etc/lighttpd/lighttpd.conf
├─32393 /usr/bin/php-cgi
├─32396 /usr/bin/php-cgi
├─32397 /usr/bin/php-cgi
├─32398 /usr/bin/php-cgi
└─32399 /usr/bin/php-cgi

Dec 04 22:43:12 pihole systemd[1]: Starting Lighttpd Daemon...
Dec 04 22:43:12 pihole systemd[1]: Started Lighttpd Daemon.
rambo@pihole:~$ service pihole* status
● pihole-FTL.service - LSB: pihole-FTL daemon
Loaded: loaded (/etc/init.d/pihole-FTL; generated)
Active: active (exited) since Fri 2020-12-04 22:43:14 PST; 18min ago
Docs: man:systemd-sysv-generator(8)
Process: 32518 ExecStart=/etc/init.d/pihole-FTL start (code=exited, status=0/SUCCESS)

Dec 04 22:43:14 pihole systemd[1]: Starting LSB: pihole-FTL daemon...
Dec 04 22:43:14 pihole pihole-FTL[32518]: Not running
Dec 04 22:43:14 pihole su[32536]: (to pihole) root on none
Dec 04 22:43:14 pihole su[32536]: pam_unix(su:session): session opened for user pihole by (uid=0)
Dec 04 22:43:14 pihole su[32536]: pam_unix(su:session): session closed for user pihole
Dec 04 22:43:14 pihole systemd[1]: Started LSB: pihole-FTL daemon.
5. Configuration
- Pihole Control Panel:
http://piholeServerIp/admin - Ad Lists:
https://firebog.net
https://github.com/mmotti/pihole-regex/blob/master/regex.list - Test
dig @<piholeServerIp> blockedsite.com - Flush dns
sudo systemd-resolve --flush-caches # Ubuntuservice nscd restart # Redhatipconfig /flushdns # Windows - Blacklist – regex blocks
Youtube ads:.*sn-\S{4,}-\S{4,}\.googlevideo\.com
Youtube.com:(\.|^)(youtu\.?be.*|googlevideo\.com)$ - Change admin password
sudo pihole -a -p
6. Troubleshooting
- Issue: ‘DNS Service Not Running’
Resolution 1:pihole checkout master
Resolution 2: re-install pihole
– Backup:pihole -a teleporter
– Move backup file: copy the tar.gz file from current directory$(pwd)/*.tar.gzto desktop where Internet browser is available for the restoring step
– Uninstall:pihole uninstall
– Reinstall:sudo apt install pihole
– Restore settings: Login into Pi-hole > Settings > Teleporter > Under Restore, click Choose File > pick the backup file in tar.gz format > open > click Restore > OK
Resolution 3:
– Run debug:pihole -d
– Grant Pihole TCP:53 access to localhost:sudo iptables -A INPUT -s 127.0.0.0/8 -p tcp -m tcp --dport 53 -j ACCEPTResolution 4: Set the watchservice script to ensure that pihole is running at all times - Issue: unable to reach server via port 80
Resolution:sudo iptables -I INPUT -p tcp --dport 80 -j ACCEPT - Issue: Pihole service crashes at random times
Resolution: create a service watcher script
7. How to create a Backup via command line:
cd ~/Desktop
pihole -a teleporter
ls ~/Desktop
Categories:

Brandon
Update for 21.04 to skip the OS check:
sudo curl -sSL https://install.pi-hole.net | PIHOLE_SKIP_OS_CHECK=true sudo -E bash
kimconnect
Nice! Thanks for the input, Brandon!
John Doe
Why are you hiding your internal IP address? It’s not like anyone can reach it.
kimconnect
Hi ‘John Doe’, you’re right that blanking out these things are seemingly inconsequential. If someone could compromise a network to reach the ‘intranet’, it’s game over for the target entity anyway. At this point, it’s not even paranoia – it’s a habit.
wko
Rule of thumb in networking, trust no one, also thanks for the guide.
kimconnect
You’re welcome, and thanks