Install the dynamic IP updater:
# Install the app
sudo apt-get install ddclient
Press Enter repeatedly to accept null values. Then edit the config file manually:
sudo vim /etc/ddclient.conf
Input values similar to this:
# Configuration file for ddclient generated by debconf
#
# /etc/ddclient.conf
protocol=dyndns2
ssl=yes
use=web, web=myip.dnsomatic.com
server=updates.opendns.com
login=OpenDnsUsername [actual username such as [email protected]]
password='OpenDnsPassword' [actual password]
network_label
Please note that ‘network_label’ is found by accessing https://login.opendns.com/?return_to=https%3A%2F%2Fdashboard.opendns.com%2Fsettings%2F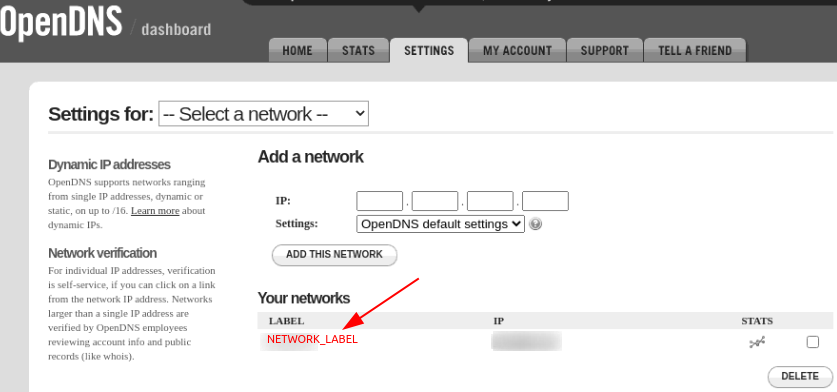
Edit the /etc/default/ddclient file to resemble this
# Configuration for ddclient scripts
# generated from debconf on Sun Jun 24 00:08:13 EDT 2018
#
# /etc/default/ddclient

# Set to "true" if ddclient should be run every time DHCP client ('dhclient'
# from package isc-dhcp-client) updates the systems IP address.
run_dhclient="false"

# Set to "true" if ddclient should be run every time a new ppp connection is
# established. This might be useful, if you are using dial-on-demand.
run_ipup="false"

# Set to "true" if ddclient should run in daemon mode
# If this is changed to true, run_ipup and run_dhclient must be set to false.
run_daemon="true"

# Set the time interval between the updates of the dynamic DNS name in seconds.
# This option only takes effect if the ddclient runs in daemon mode.
daemon_interval="300"
Optional: follow this easier method to edit /etc/default/ddclient
# Set the filename variable
ddclientFile=/etc/default/ddclient

# Make a backup of file
mv $ddclientFile $ddclientFile.bak

# Create a new file
sudo cat << EOF > $ddclientFile
run_dhclient="false"
run_ipup="false"
run_daemon="true"
daemon_interval="300"
EOF
Run this command to check whether configurations are valid: sudo ddclient -verbose -file /etc/ddclient.conf
# Sample Output:

rambo@pihole:/home/rambo# sudo ddclient -verbose -file /etc/ddclient.conf
CONNECT: myip.dnsomatic.com
CONNECTED: using HTTP
SENDING: GET / HTTP/1.0
SENDING: Host: myip.dnsomatic.com
SENDING: User-Agent: ddclient/3.8.3
SENDING: Connection: close
SENDING:
RECEIVE: HTTP/1.1 200 OK
RECEIVE: Server: nginx
RECEIVE: Date: Mon, 14 Dec 2020 03:21:13 GMT
RECEIVE: Content-Type: text/plain; charset=utf-8
RECEIVE: Content-Length: 12
RECEIVE: Connection: close
RECEIVE: Strict-Transport-Security: max-age=2628000
RECEIVE: X-Frame-Options: deny
RECEIVE: X-XSS-Protection: 1; mode=block
RECEIVE:
RECEIVE: 172.500.500.500
INFO: forcing updating MacDuff because no cached entry exists.
INFO: setting IP address to 172.500.500.500 for TESTNETWORK
UPDATE: updating TESTNETWORK
CONNECT: updates.opendns.com
CONNECTED: using SSL
SENDING: GET /nic/update?system=dyndns&hostname=MacDuff&myip=172.500.500.500 HTTP/1.0
SENDING: Host: updates.opendns.com
SENDING: Authorization: Basic abceHashHash
SENDING: User-Agent: ddclient/3.8.3
SENDING: Connection: close
SENDING:
RECEIVE: HTTP/1.0 200 OK
RECEIVE: date: Mon, 14 Dec 2020 03:21:14 GMT
RECEIVE: server: opendns
RECEIVE: content-length: 17
RECEIVE: content-type: text/html; charset=UTF-8
RECEIVE: x-envoy-upstream-service-time: 783
RECEIVE: x-xss-protection: 1; mode=block
RECEIVE: x-ingress-point: lax
RECEIVE: connection: close
RECEIVE:
RECEIVE: good 172.500.500.500
SUCCESS: updating TESTNETWORK: good: IP address set to 172.500.500.500
Finalize setup:
# Restart ddclient
sudo service ddclient restart

# Set it to auto-run on reboots
sudo systemctl enable ddclient
Categories: