# Check the network interface config files
ls /etc/sysconfig/network-scripts

[cuilo@web02 ~]$ ls /etc/sysconfig/network-scripts
ifcfg-ens192

# Edit the config
sudo vim /etc/sysconfig/network-scripts/ifcfg-ens192

# Make it look similar to this, then press Esc wq! to save and exit
TYPE=Ethernet
PROXY_METHOD=none
BROWSER_ONLY=no
BOOTPROTO=none
DEFROUTE=yes
IPV4_FAILURE_FATAL=no
IPV6INIT=yes
IPV6_AUTOCONF=yes
IPV6_DEFROUTE=yes
IPV6_FAILURE_FATAL=no
IPV6_ADDR_GEN_MODE=stable-privacy
NAME=ens192
UUID=cd867b06-4f5e-47a9-b9ef-2cba093aeb06
DEVICE=ens192
ONBOOT=yes
IPADDR=192.168.500.9000
PREFIX=24
GATEWAY=192.168.500.1000
DNS1=8.8.8.8
DNS2=4.4.2.2
IPV6_PRIVACY=no

# Reload the network manager
sudo systemctl restart NetworkManager.service
Troubleshooting
Sometimes, a bad configuration of the NIC, such as inputting an incorrect MAC address, can cause a disconnection. Here’s a quick fix for systems with only ONE NETWORK CARD – please use a different process for multiple NIC’s configuration.
# Remove the network card persistent settings
# sudo rm -f /etc/udev/rules.d/70.persistent-ipoib.rules # this defaults to no configs in CentOS 8
sudo rm -f /etc/sysconfig/network-scripts/*
sudo reboot
Upon reboot, the hardware may not automatically re-connect. Thus, it’s necessary to access the GUI to change the Wired Off to Connect.
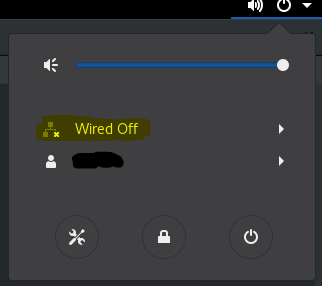
Once the networking profile is recreated, it’s possible to paste the previously known good configs back such as:
# Check the auto-generated file
ls /etc/sysconfig/network-scripts/
# If only 1 NIC is expected, use this line to edit the config
sudo vim /etc/sysconfi/network-scripts/*
# Better yet, overwrite the config file
configFileName=ifcfg-Wired_connection_1sudobash-c"cat <<EOF > /etc/sysconfig/network-scripts/$configFileName
TYPE=Ethernet
PROXY_METHOD=none
BROWSER_ONLY=no
BOOTPROTO=none
DEFROUTE=yes
IPV4_FAILURE_FATAL=no
IPV6INIT=yes
IPV6_AUTOCONF=yes
IPV6_DEFROUTE=yes
IPV6_FAILURE_FATAL=no
IPV6_ADDR_GEN_MODE=stable-privacy
NAME=ens192
UUID=cd867b06-4f5e-47a9-b9ef-2cba093aeb06
DEVICE=ens192
ONBOOT=yes
IPADDR=192.168.1.102
PREFIX=24
GATEWAY=192.168.1.254
DNS1=8.8.8.8
DNS2=4.4.2.2
IPV6_PRIVACY=no
EOF"
# After the configs are changed, reload and apply them
sudo nmcli networking off; sudo nmcli networking on
Categories: